21 septiembre 2012

Halloween for Chacha


Supplies Needed: 
PSP 
Tube of choice. Art by Irmino Pin Oops. Find the tube: here
Cluster frame by me: here
Mask 080 from PSP X
Plugin: 
Xenofex 2
Eyecandy 4000
Font here


Open the cluster. Choose one, delete the other layers.
Resize, expand canvas and move the cluster to the bottom

Add a new layer and sent to the bottom. 
Floodfill with a lighter color, my choice: #ecb5ca.
Layers - Load mask: Mask080

Merge group.

Ajust - Blur - Gaussian Blur:
Radius: 6 pixels.

Add a new layer.
Floodfill with a darker color, my choice: #a6316c

Effects - Plugins - Eyecandy 4000 - Weave:

Layers - Load mask: Mask080

Merge group. Duplicate the layer.

Effects - Plugins - Xenofex 2 - Constellation:

Open the tube, c/p in the canvas. Place it in the left side.

Add drop shadow:
V: 2 H: 2
O: 50 B: 11

Decorate with more elements if you want.

Add copyright and your name. 

To animate:

Activate the constellation layer.

Adjust - Add Noise:

Uniform
86 percent
Monochrome

Edit - Copy merged. Open animation shop, paste as a new animation.
Back to psp, undo the noise effect and apply again but change the percent to: 74
Copy merged, in animation shop, paste after current frame.
Repeat one more time and change the percent of noise to: 66
Play the animation, save if you like
:)

Extras: Crazy Sexy Halloween

ღ Download here

ღ Tube free by Ismael Rac

ღ Scrap Sexy Witch by Inzpired Creationz


Freebie Cluster: Sexy Witch


ღ Freebie Cluster frame and Cluster 

ღ Scrap Sexy Witch  by Inzpired Creationz: HERE

ღ PSP and PSD files


**new link here DOWNLOAD

DOWNLOAD

**new link here DOWNLOAD

20 septiembre 2012

VIP Halloween


Supplies Needed: 
PSP 
Tube of choice. Art by SkyScraps. Find the tube: here
Cluster frame by me: here
Masks by Gems 174 & 212 here
Plugins:
Muras Meister  Copies
Eyecandy 4000
Penta .com: Dot and Cross
Font here and here


Open the cluster. Resize, delete the layers you're not going to use.
Change the size of the canvas to make room for the tube.

Add a new layer at the bottom floodfill with a color from the cluster or tube.
My choice: #1a534d

Effects - Plugins - Penta .com - Dot and Cross:

Activate the font tool:

Write the wording of choice.  I wrote: vip halloween

Effects - Plugins - Eyecandy 4000 - Gradient Glow:


Effects - Plugins - Muras Meister - Copies:

Merge the background with the wordart.

Layers - Load mask: gemsmasks-212

Merge group.

Add a new layer, flood fill with black.

Layers - Load mask: gemsmasks-174.

Merge group.

Adjust - Add Noise:

Gaussian 
50 percent
Monochrome

Open the tube, c/p in the canvas. Place it above the cluster. 

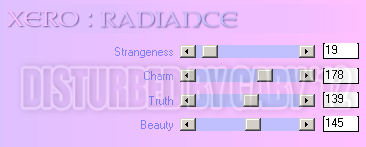
Effects - Plugins - Xero - Radiance:

Apply twice.

Add drop shadow:
V: 0 H: 4
O: 55 B: 7

Add copyright and your name. Merge Visible, copy and paste as new image. Export as a png or jpg.

Extras: Rebellious Halloween


ღ Download extras here

ღ Tube by Arthur Crowe

ღ Scrap VIP Halloween by Bibis Collection


Cluster and Cluster Frame: VIP Halloween

ღ Freebies cluster and cluster frame

ღ Scrap VIP Halloween by Bibis Collection here

ღ PSP and PSD files

DOWNLOAD 

**new link here DOWNLOAD


18 septiembre 2012

Forever Yours


Supplies Needed:
Psp
Tube of choice. Art by Roman Zaric. Purchase it: here
Template 69 by Tracy F here
Plugins:
Xero here
Penta .com - Jeans
Eyecandy 4000
Font here


Open the template. Duplicate the file and close the orignal.
Delete the layer:
Tracy.F Designz

I'll start from the bottom to the top layer.

Activate the layer: rectangle

Change the color if you want.

Effects - Plugins - Penta .com - Jeans

Make a gradient with two  colors from your tube:
My choice:

Foreground: #1f1f1f
Background: #c0c0c0

Style: Linear
Angle: 45
Repeats: 2
Invert: unchecked

Activate the layer: circle 1
Selections - All - Float - Defloat.
Add a new layer. Floodfill with the gradient.
Delete the original template layer.

Effects - Texture Effects - Blinds:


Effects - Texture Effects - Blinds:

Deselect.

Activate the layer: circle 2
Selections - All - Float - Defloat.

Effects - Plugins - Xero - Fritillary: 

Selections - Modify - Contract by: 5 pixels.
Selections - Invert. 

Adjust - Add Noise:

Random
50 percent
Monochrome

Deselect.

Change the settings of the gradient to:

Style: Linear
Angle: 45
Repeats: 1
Invert: unchecked

Activate the layer: half circle
Selections - All - Float - Defloat.
Add a new layer. Floodfill with the gradient.
Delete the original template layer.

Effects - Plugins - Penta .com - Jeans

Effects - Plugins - Xero - Fuzzifier: 

Open the closeup of the tube. C/p in the canvas. Place it above the half circle.
Select the part you like. Selections - Invert. Edit - Clear. Deselect.
In the layer palette, change the blend mode to: Burn.

Activate the layer: strips
Selections - All - Float - Defloat.
Add a new layer. Floodfill with the gradient.
Delete the original template layer.

Apply the same blind effects used in the layer:  circle 1

Adjust - Add Noise:

Random
10 percent
Monochrome

Activate the layer: dotted line
Colorize to match your tube.
I applied:
Hue: 0
Saturation: 200

Activate the layer: text
Colorize with the same settings.
Duplicate. In the layer palette, change the blend mode to: Hard Light.
Merge down.

Effects - Plugins - Eyecandy 4000 - Glass: 


Effects - Plugins - Eyecandy 4000 - Gradient Glow: 


Apply the same gradient glow to all the glitter layers:
glitter rectangle
glitter circle 1
glitter circle 2

Open the tube, c/p in the canvas. Resize.
Effects - Plugins - Xero - Radiance: 

Effects - Plugins - Eyecandy 4000 - Shadow Lab: 

Add your name and copyright. Merge Visible, copy and paste as new image. 
Export as a png or jpg.

Inked Witch


Supplies Needed:
Psp
Tube of choice. Art by Foto-Retro from ART, pruchase it here
Scrap kit (PTU) Dark Gothic by Niqui's Designs: here
Font here


Open a new image: 600x500

Open: nq-element 55. c/p in the canvas. Resize at 420x350 pixels (smart size)
Grab the magic wand, click inside the frame. Expand by 10 pixels

Open: nq-paper 6. c/p in the canvas.Resize at 300x250 pixels (smart size)
Duplicate the layer. 
Adjust - Add Noise:

Uniform
35 percent
Monochrome

In the layer palette change the blend mode to soft light. Merge down.
Open: nq-element 22, C/p in the canvas, Resize at 240x200 pixels (smart size)
Place it above the paper. Remove the excess outside the frame.

Open: nq-element 3. C/p in the canvas, Resize at 390x325 pixels (smart size).
Place it above the frame.

Open: nq-element 50. C/p in the canvas, Resize at 420x350 pixels (smart size).
Place it in the left side of the frame. Duplicate. Image - Mirror.

Open: nq-element 6. C/p in the canvas, Resize at 303x252 pixels (smart size).
Place it in the right bottom side of the frame.

Open: nq-element 14. C/p in the canvas, Resize at 235x196 pixels (smart size).
Place it at the bottom of the frame.

Open: nq-element 21. C/p in the canvas, Resize at 100x83 pixels (smart size).
Place it above the leaves.


Open: nq-element 17. C/p in the canvas, Resize at 100x83 pixels (smart size).
Place it above the leaves.

Open: nq-element 31. C/p in the canvas, Resize at 110x92 pixels (smart size).
Place it below the mail box. Duplicate and place it at the top behind the leaves.

Add more elements the tag:
nq-element 12
nq-element 26
nq-element 27
nq-element 52


Always: Resize, sharpen and place as desire. 
Add drop shadow:
V: 4 H: 4
O: 40 B: 6


Open the tube, c/p in the canvas. Resize and place it in the left side.
Add drop shadow:
V: -2 H: 5
O: 45 B: 8

Add copyright and your name. Merge Visible, copy and paste as new image. Export as a png or jpg.

17 septiembre 2012

Beautiful Blend


Supplies Needed:
Psp
Tube of choice. Art by Vika Misticheskaya from SATC. Purchase it: here
Plugins:
Xero - Soft Vignette here
AAA Filters and Frames
Penta .com - Jeans
Font here


Open a new canvas: 600x200

make a gradient with two colors:
my choice: 
fore: #a0afbc
back: #cde0bf
angle: 307
repeats 3


Adjust - Blur - Gaussian Blur:
Radius: 15

Effects - Plugins - Xerox - Soft Vignette:

**Change the Effect Type to: Foreground colour if it's necesary.

Effects - Plugins - Penta .com - Jeans:

**If it's needed. Duplicate and change the blend mode to: Hard light or Soft Light.

Open the tube or closeup, place the first in the left size.
Duplicate and resize, place it in the center, duplicate again and resize and move it
to the right side. Merge down these layers and colorize to black and white:

In the layer palette change the blend mode to: Overlay.
Duplicate again and colorize to black and white the original layer.
Activate the duplicate. 

Effects - Plugins - AAA Filters - Transparent Vignette

For the wordart:

With the font tool:

Color of choice: #84a79e

Write your text strech if it's needed. Convert to raster layer. 
Selections - All - Float. Defloat.

Add a new layer and apply a brush of choice with a lighter color: #e2ecdd

Do not deselect yet.

Effects - 3d Effects - Cutout:

Use a light color from the palette you're using.

Deselect activate the text layer:

Add drop shadow:
V: 1 H: 1
O: 50 B: 3

Add your name and copyright. Merge Visible.

Effects - Plugins - AAA Frames - Transparent Frame:

Add a new layer, move below. Floodfill with white or any light color.
Adjust - Add Noise:
Uniform
Monochrome
86 percent

Copy merged. Open animation shop, paste as a new animation.
Back to psp undo the noise effect apply again but change the percent to: 95 
Copy Merged, paste after current frame, back to psp.
Undo the effect, apply again but change the percent to: 90

Play the animation if you like it save it :)

Enrich my soul


Supplies Needed: 
PSP 
Tube of choice. I am using one by Anna Liwanag. Find the tube: here
Cluster frame by me: here
Wordart 007 (template + samples) by me here
Plugins:
Neology: Blend Mosaic
Penta .com: Color Dot
Font here


Open the cluster frame. Delete the layer you don't want.

Make a gradient with two colors from your tube:
My choice:

Foreground: #afc11c
Background: #deed60

Style: Sunburst
Repeats: 2
Invert: unchecked

Activate the layer: frame background. Selections - All - Float - Defloat.

Add a new layer and flood fill with the gradient and delete the original layer.
Effects - Plugins - Neology - Blend Mosaic: 

Effects - Texture Effects - Blinds:

Effects - Plugins - Penta .com - Color Dot:

Open the tube, c/p in the canvas. Place it in the right side.
Add drop shadow:
V: -1 H: 3
O: 70 B: 7

Open the wordart, c/p in the canvas, resize and place it in the left top side.

Add drop shadow:
V: 4 H: 4
O: 30 B: 5


Add your name and copyright.

To animate the eyes:

First make sure the artist allows animation.

Copy merged your tag with a background color of choice. 
Open animation shop. Paste as a new animation.

Add a new layer above the tube, make a lot of zoom:
Pick a color from the top center of the eye, not too light or dark.

Add a new layer above the tube, activate the brush:

Draw the first part of the eyelid:

**Optional, activate the soften brush:


Apply once or twice above the eyelid:

Copy merged, go to animation shop, paste after current frame

Back to psp, be sure you're in the brush layer, draw a little more:

Copy merged.  go to animation shop, paste after current frame.

Copy the first and last frame, after the last one:
you have the frames:
1,2 and 3. Copy and paste again 1 and 3.

The speed is important to make the blink look good :)

These are the speed I've used for my tag:

Frame 1 - Speed: 120

Frame 2 - Speed: 15

Frame 3 - Speed: 10

Frame 4 - Speed: 50

Frame 5 - Speed: 15


Feel free to change the speed to suit your needs. If you have any questions let me know!
Hugs ♥