Mostrando entradas con la etiqueta Roman Zaric. Mostrar todas las entradas

25 octubre 2012

Free Extras: Floral Seduction


ღ  Teaser Alert ღ 

ღ New tag created with a gorgeous tube by Roman Zaric
The tube it's going to be released soon at: http://romanzarictubes.com/

ღ  Free set of extras, download here


18 septiembre 2012

Forever Yours


Supplies Needed:
Psp
Tube of choice. Art by Roman Zaric. Purchase it: here
Template 69 by Tracy F here
Plugins:
Xero here
Penta .com - Jeans
Eyecandy 4000
Font here


Open the template. Duplicate the file and close the orignal.
Delete the layer:
Tracy.F Designz

I'll start from the bottom to the top layer.

Activate the layer: rectangle

Change the color if you want.

Effects - Plugins - Penta .com - Jeans

Make a gradient with two  colors from your tube:
My choice:

Foreground: #1f1f1f
Background: #c0c0c0

Style: Linear
Angle: 45
Repeats: 2
Invert: unchecked

Activate the layer: circle 1
Selections - All - Float - Defloat.
Add a new layer. Floodfill with the gradient.
Delete the original template layer.

Effects - Texture Effects - Blinds:


Effects - Texture Effects - Blinds:

Deselect.

Activate the layer: circle 2
Selections - All - Float - Defloat.

Effects - Plugins - Xero - Fritillary: 

Selections - Modify - Contract by: 5 pixels.
Selections - Invert. 

Adjust - Add Noise:

Random
50 percent
Monochrome

Deselect.

Change the settings of the gradient to:

Style: Linear
Angle: 45
Repeats: 1
Invert: unchecked

Activate the layer: half circle
Selections - All - Float - Defloat.
Add a new layer. Floodfill with the gradient.
Delete the original template layer.

Effects - Plugins - Penta .com - Jeans

Effects - Plugins - Xero - Fuzzifier: 

Open the closeup of the tube. C/p in the canvas. Place it above the half circle.
Select the part you like. Selections - Invert. Edit - Clear. Deselect.
In the layer palette, change the blend mode to: Burn.

Activate the layer: strips
Selections - All - Float - Defloat.
Add a new layer. Floodfill with the gradient.
Delete the original template layer.

Apply the same blind effects used in the layer:  circle 1

Adjust - Add Noise:

Random
10 percent
Monochrome

Activate the layer: dotted line
Colorize to match your tube.
I applied:
Hue: 0
Saturation: 200

Activate the layer: text
Colorize with the same settings.
Duplicate. In the layer palette, change the blend mode to: Hard Light.
Merge down.

Effects - Plugins - Eyecandy 4000 - Glass: 


Effects - Plugins - Eyecandy 4000 - Gradient Glow: 


Apply the same gradient glow to all the glitter layers:
glitter rectangle
glitter circle 1
glitter circle 2

Open the tube, c/p in the canvas. Resize.
Effects - Plugins - Xero - Radiance: 

Effects - Plugins - Eyecandy 4000 - Shadow Lab: 

Add your name and copyright. Merge Visible, copy and paste as new image. 
Export as a png or jpg.

18 agosto 2012

Dangerous Curves


Supplies Needed:
Psp
Tube of choice. Art by Roman Zaric. Purchase it: here
Plugin: tramages - two the line 
Eye Candy 4000 - HSB Noise
Font here


Open a new image: 600x200
Open the tube, select two colors and make a gradient:

My choice:
Foreground: #26a32d
Background: #d0f7a3

Style: linear
Angle: 0
Repeats: 0
Invert: unchecked

Floodfill the canvas with the gradient.

Effects - Plugins - Eyecandy 4000 - HSB Noise:

Effects - Texture Effects - Blinds:

Effects - Plugins - Tramages - Two the line:

Duplicate. Adjust - Blur - Gaussian Blur:
Radius: 3

In the layer palette, change the blend mode to: Hard Light.
Merge visible.

Open the tube, c/p in the canvas. Resize and place it in the canvas.
Duplicate. Adjust - Blur - Gaussian Blur:
Radius: 3

In the layer palette, change the blend mode to: Overlay.
Merge down.

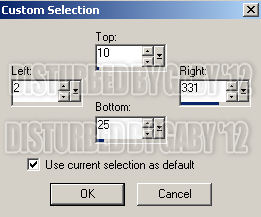
Add a new layer and activate the selection tool:

And make two rectangles in the top left side.
Make the first, hold the shift key and make the second:
This are the exact size from mine:

and

Apply drop shadow:
V: 0 H: 2
O: 100 B: 10

Deselect.

Duplicate the layer. Image - Mirror. Image - Flip. 
Apply the same shadow to the tube.

Add a border, copyright and your name.

To animate:

Select the background layer.

Effects - Plugins - Eyecandy 4000 - HSB Noise:

Edit - Copy Merged. 
Open Animation Shop and paste as a new animation.

Back to psp. Edit undo the last effect applied.
apply HSB Noise but change the random seed by clicking in the button.
Copy merged, in AS paste After current frame. 
Repeat 1 or 3 more times. Until you like it.
Change the animation speed to: 15 Enter)
If you like it save as gif.
You're done! :)

16 agosto 2012

Teaser Tag: Roman Zaric


♥ Teaser Alert ♥
Tag by me with a gorgeous tube by Roman Zaric, the tube is special because it comes with another tail of a snake :D
The tube it's going to be released soon at: http://romanzarictubes.com/store/index.php?route=common/home