Open a new image: 620x600
Open the paper: DBG - LO - Paper01. C/p in the canvas.
Layers - Load/Save Mask - Load Mask from the disk:
Merge group. Duplicate. Merge visible. Resize at 95 percent - Smart Size.
Open: DBG -LO - 003. C/p in the canvas, resize at 75 percent - Smart Size.
Place it in the center.
With the magic wand click inside of the frames, expand the selection: 10 pixels.
Open: DBG - LO - Paper02. C/p in the canvas, resize at 50 percent - Smart Size.
Place it below the frame. Selections - Invert. Edit - Clear. Selections - Invert.
Open the close up of the tube, c/p in the canvas, place it in the right side.
Selections - Invert. Edit - Clear. Deselect.
In the layer palette change the blend mode to: Lighten. Colorize to black and white.
Open the tube, c/p in the canvas and resize if it's needed.
Place it in the left side, above the frame layer.
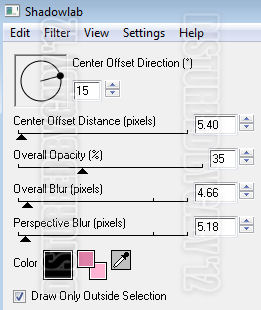
Effects - Plugins - Eye Candy 4000 - Shadowlab:
Open: DBG -LO - 030. C/p in the canvas, resize at 40 percent - Smart Size.
Place it in the bottom right.
Open: DBG -LO - 062. C/p in the canvas, resize at 40 percent - Smart Size.
Place it in the top right side of the frame.
Open: DBG -LO - 050. C/p in the canvas, place it next to the hanging lamp.
Open: DBG -LO - 015. C/p in the canvas, resize at 80 percent - Smart Size.
Place it in the left side of the frame, behind the tube layer.
Open: DBG -LO - 009. C/p in the canvas, resize at 50 percent - Smart Size. Twice.
Place it in the bottom right side of the frame.
Open: DBG -LO - 012. C/p in the canvas, resize at 70 percent - Smart Size.
Place it in the bottom right, in front of the small flower.
Open: DBG -LO - 013. C/p in the canvas, resize at 70 percent - Smart Size.
Image - Flip. Image - Free Rotate: Left - 30 degrees. Place it in the bottom right.
Open: DBG -LO - 021. C/p in the canvas, resize at 50 percent - Smart Size.
Place it in the right bottom, above the leaves.
Open: DBG -LO - 019. C/p in the canvas, resize at 80 percent - Smart Size.
Image - Mirror. Place it in the bottom of the frame.
Open: DBG -LO - 053. C/p in the canvas, resize at 45 percent - Smart Size.
Place it in the tip of the ribbon and eraser a small part.
Open: DBG -LO - 007. C/p in the canvas, resize at 40 percent - Smart Size.
Place it in the bottom center.
Open: DBG -LO - 060. C/p in the canvas, resize at 50 percent - Smart Size.
Image - Mirror. Place it in the bottom center, next to the black flower.
Open: DBG -LO - 048. C/p in the canvas, resize at 55 percent - Smart Size. Twice.
Place it at the bottom, in front of the box.
Open: DBG -LO - 056. C/p in the canvas, resize at 55 percent - Smart Size.
Place it in the bottom center, next to the black box.
Open: DBG -LO - 064. C/p in the canvas, resize at 45 percent - Smart Size.
Place it in the bottom right, next to the glass vial.
Open: DBG -LO - 054. C/p in the canvas, resize at 40 percent - Smart Size.
Place it in the bottom center, next to the golden leave.
Open: DBG -LO - 014. C/p in the canvas, resize at 55 percent - Smart Size.
Image - Free Rotate: Left - 40 degrees. Place it in the bottom left corner.
Open: DBG -LO - 038. C/p in the canvas, resize at 45 percent - Smart Size.
Place it at the bottom left, in front of the leaves.
Open: DBG -LO - 057. C/p in the canvas, resize at 50 percent - Smart Size.
Place it at the bottom left.
Open: DBG -LO - 022. C/p in the canvas, resize at 65 percent - Smart Size.
Image - Mirror. Place it in the bottom left, between the box and letter.
Open: DBG -LO - 063. C/p in the canvas, resize at 70 percent - Smart Size.
Place it in the bottom left, in front of the letter.
Open: DBG -LO - 039. C/p in the canvas, resize at 50 percent - Smart Size. Twice.
Image - Free Rotate: Left - 10 degrees. Place it at the bottom of the glass of wine.
Open: DBG -LO - 068. C/p in the canvas, resize at 50 percent - Smart Size. Twice.
Place it in the top center of the frame.
Sharpen the elements and apply shadow.
Effects - Plugins - Eye Candy 4000 - Shadowlab:
Add the name and copyright info.
To animate:
Close all the layers below the close up with this layer included. (mask, paper and close up)
Merge visible all the open layers. Rename it: 1. Close it.
Open the rest of the layers. Copy merged.
Open animation shop and paste as a new animation. DUplicate until you have 21 frames.
Open: SimoneAni256.mng
Activate the first frame, select all. Animation - Resize at 75 percent - Bicubic.
Drag into the tag and place it at the bottom center.
Back to psp. Open the layer 1 and copy.
In animation shop: paste as a new animation and duplicate until you have 21 frames.
Activate the first frame, select all. Drag into the tag and place it where it belongs.
**Adding a background to the transparent animation.
Animation - Animation Propieties
Change the black color for the color of your choice, mine is white:
Apply and the color will be applied in all the frames selected.
Change the speed to: 12, play the animation and save if you like! :)