Supplies Needed:
Psp & Animation shop
Tube of choice. Art by Celine Pinup the tube is available here
Scrap kit Rock Angel (PTU) by Designs by Joan here
Animation starspinner by Lovey here
Mask 363 by Vix here
Plugins:
Eye candy 4000
Font here
Open a new image: 620x620.
Open the paper: paper 2. C/p in the canvas.
Open: RockAngel-1. C/p in the canvas and place it in the middle of the paper, add shadow and merge visible.
Layers - Load/Save Mask - Load Mask from the disk:
Merge group.
Open: RockAngel14. C/p in the canvas and place it in the center.
Open: RockAngel75. C/p in the canvas and place it in the bottom center.
Open the tube, c/p in the canvas. Place it in the center.
Effects - Plugins - Eye Candy 4000 - Shadowlab:
Open: RockAngel28. C/p in the canvas, resize at 70 percent - Smart Size.
Place it in the left bottom side.
Open: RockAngel82. C/p in the canvas, resize at 50 percent - Smart Size.
Place it in the left bottom, behind the guitar.
Open: RockAngel-4. C/p in the canvas, resize at 40 percent - Smart Size.
Place it in the bottom center.
Open: RockAngel-3. C/p in the canvas, resize at 45 percent - Smart Size.
Place it in the left bottom, behind the skull.
Open: RockAngel85. C/p in the canvas, resize at 30 percent - Smart Size.
Place it in the bottom, next to the skull.
Open: RockAngel105. C/p in the canvas, resize at 30 percent - Smart Size.
Place it in the bottom, next to the rose.
Open: RockAngel16. C/p in the canvas, resize at 45 percent - Smart Size.
Place it in the bottom, next to the stud bracelet.
Open: RockAngel81. C/p in the canvas, resize at 45 percent - Smart Size.
Image - Mirror. Place it in the right bottom corner.
Open: RockAngel81. C/p in the canvas, resize at 40 percent - Smart Size.
Place it in the right bottom corner, behind the boot.
Open: RockAngel42. C/p in the canvas, resize at 30 percent - Smart Size.
Place it in the right bottom next to the guitar pick.
Open: RockAngel107. C/p in the canvas, resize at 40 percent - Smart Size.
Place it in the left bottom, move the layer behind the speakers.
Activate the top layer.
Open: RockAngel70. C/p in the canvas, resize at 45 percent - Smart Size.
Place it in the middle left side. Duplicate. Image - Mirror.
Open: RockAngel92. C/p in the canvas, resize at 65 percent - Smart Size.
Place it in the top left.
Open: RockAngel-5. C/p in the canvas, resize at 30 percent - Smart Size.
Place it in the top right.
Open: RockAngel116. C/p in the canvas, resize at 30 percent - Smart Size.
Place it in the middle right side.
Open: RockAngel73. C/p in the canvas, resize at 50 percent - Smart Size.
Place it at the bottom, above the elements.
Open: RockAngel86. C/p in the canvas, resize at 50 percent - Smart Size.
Place it in the bottom left. Duplicate. Image - Mirror. Image - Flip.
Move the layer above the speakers.
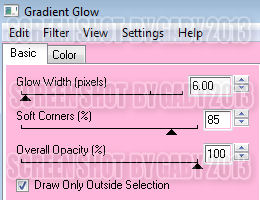
Effects - Plugins - Eye Candy 4000 - Gradient Glow:
Sharpen the elements and apply shadow.
Effects - Plugins - Eye Candy 4000 - Shadowlab:
Add the name and copyright info.
To animate:
Close all the layers below the tube: mask, speakers, elements, etc.
Merge visible all the open layers. Rename it: 1. Close the merged layer.
Open the rest of the layers and activate the layer with the white circle (RockAngel14).
Adjust - Add/ Remove Noise: Add Noise:
Uniform
30 percent
Monochrome
Copy Merged. Open animation shop, paste as a new animation.
Back to psp, undo the effect and apply again and change the percent to: 39.
Copy merged, in animation shop, paster after current frame. Repeat once more and change the percent to: 34.
Activate the first frame, select all. Copy, click in the last frame and paste after current frame.
Continue until you have 15 frames. Activate the first frame, select all.
Open: starspinner-madebylovey'11.mng
Drag into the tag and place it in the left top part of the white circle. Undo the drag and place it again but now
in the center right, above the buldings, play the animation if you like, leave it.
Back to psp. Open the layer: 1, copy and paste as a new animation in animation shop.
Duplicate until you have 15 frames.
Activate the first frame, select all. Place it where it belongs to finish the tag.
**Adding a background to the transparent animation.
Animation - Animation Properties
Change the black color for the color of your choice, mine is white:
Apply and the color will be applied in all the frames selected.
Change the speed to: 13, play the animation and save if you like! :)


No hay comentarios:
Publicar un comentario