Supplies Needed:
Psp & Animation Shop
Tube of choice. Art by Screaming Demons, available here
Scrap kit Hallows Eve (PTU) by Sky Scraps here
Animation 135 by Simone here
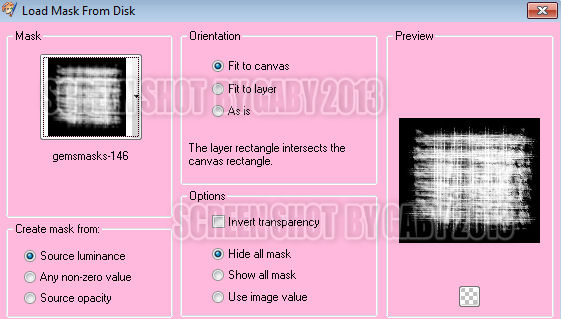
Mask 146 by Gems here
Plugins:
Eye candy 4000
Font here
Open a new image: 620x550.
Open the paper: SkyScraps-HE-pp1. C/p in the canvas. Resize at 80 percent - Smart Size.
Layers - Load/Save Mask - Load Mask from the disk:
Merge group. Duplicate. Merge visible. Resize at 95 percent - Smart Size.
Open: SkyScraps-HE-E81. C/p in the canvas. Resize at 60 percent - Smart Size.
Place it in the left side.
Open: SkyScraps-HE-E83. C/p in the canvas, place it in the right side.
Open: SkyScraps-HE-E82. C/p in the canvas, place it in the left side.
Open: SkyScraps-HE-E78. C/p in the canvas. Resize at 70 percent - Smart Size.
Place it in the right side.
Open: SkyScraps-HE-E23. C/p in the canvas. Resize at 70 percent - Smart Size.
Place it in the top right side.
Open: SkyScraps-HE-E6. C/p in the canvas. Resize at 50 percent - Smart Size.
Place it above the tree hole.
Open: SkyScraps-HE-E63. C/p in the canvas. Resize at 70 percent - Smart Size.
Place it in the right side.
Open: SkyScraps-HE-E74. C/p in the canvas. Resize at 40 percent - Smart Size.
Place it in the bottom left. Duplicate. Image - Mirror.
Open: SkyScraps-HE-E36. C/p in the canvas. Resize at 45 percent - Smart Size.
Image - Free Rotate: Right - 25 degrees. Place it in the right side, above the tree hole.
With the magic wand, click inside the left frame and expand the selection: 10 pixels.
Open paper: SkyScraps-HE-pp1. C/p in the canvas, resize at 50 percent - Smart Size.
Selections - Invert. Edit - Clear. Selections - Invert.
Open the close up of the tube, C/p in the canvas, place it above the paper.
Selections - Invert. Edit - Clear. Deselect.
In the layer palette change the blend mode to: Hard Light.
Open: SkyScraps-HE-E67. C/p in the canvas. Resize at 50 percent - Smart Size.
Place it above the close up, at the bottom and remove any excess outside the frame.
Open: SkyScraps-HE-E8. C/p in the canvas. Resize at 40 percent - Smart Size.
Place it at the bottom of the frame.
Open: SkyScraps-HE-E68. C/p in the canvas, place it at the bottom and eraser around the grass.
Open: SkyScraps-HE-E80. C/p in the canvas. Resize at 55 percent - Smart Size.
Image - Mirror. Place it in the bottom left.
Open: SkyScraps-HE-E72. C/p in the canvas. Resize at 50 percent - Smart Size. Twice
Place it in the bottom left, next to the skull.
Open: SkyScraps-HE-E51. C/p in the canvas. Resize at 55 percent - Smart Size. Twice
Place it in the left, at the top of the books.
Open: SkyScraps-HE-E69. C/p in the canvas. Resize at 80 percent - Smart Size.
Place it in the right.
Open: SkyScraps-HE-E61. C/p in the canvas. Resize at 50 percent - Smart Size. Twice
Place it in the bottom right, in front of the mushrooms.
Open: SkyScraps-HE-E42. C/p in the canvas. Resize at 55 percent - Smart Size. Twice
Image - Mirror. Place it in the top of the wood frame.
Open the tube c/p in the canvas and place it in the left side.
Effects - Plugins - Eye Candy 4000 - Shadowlab:
Sharpen the elements and apply shadow.
Effects - Plugins - Eye Candy 4000 - Shadowlab:
Add the name and copyright info.
To animate:
Activate the layer with the close up.
Effects - Artistic Effects - Halftone:
Apply halftone again but change the square size to: 8
Copy merged, Open animation shop and paste as a new animation in animation shop.
Back to psp, undo the effect and apply again and change the size to: 13
Copy merged, in animation shop, paster after current frame. Repeat two more times. (4 frames in total)
Frame 3:
Square size: 7
Frame 4:
Square size: 4.
Activate the first frame, select all. Copy, click in the last frame and paste after current frame.
Continue until you have 16 frames.
Open: SimoneAni135.psd
Activate the first frame, select all.
Animation - Cull Animation: Remove 1 frame every 3 frames.
Drag the animation into the tag and place it in the bottom right corner of the wood frame.
Activate the first frame, select all. Place it where it belongs to finish the tag.
**Adding a background to the transparent animation.
Animation - Animation Propieties
Change the black color for the color of your choice, mine is white:
Apply and the color will be applied in all the frames selected.
Change the speed to: 14, play the animation and save if you like! :)


No hay comentarios:
Publicar un comentario