31 enero 2013

Kinky Valentine Games


Supplies Needed:
Psp & Animation Shop
Tube of choice. Art by SkyScraps, available here
Scrap kit Hardcore Valentine (PTU) by Inzpired Creationz here
Mask 004 by me here
Animation 26 by Simone here
Plugins:
Eye candy 4000
Xero here
Richard Rosenman here
Dsb Flux
Font here


Open a new image: 620x550

Open: Halftone 2. C/p in the canvas. Place it in the center.

Open: Halftone 3. C/p in the canvas, resize at 70 percent - Smart Size.
Place it in the left side.

Effects - Plugins - Eye Candy 4000 - Glass:


Add a new layer, with the magic wand click inside. 
Open the paper: 9. Copy and paste into the selection. Deselect.

Layers - Load/Save Mask - Load Mask from the disk:

Merge group. Selections - All - Float. Defloat.

Open the close up of the tube, c/p in the canvas and place it above the mask.
Selections - Invert. Edit -Clear. Deselect.
In the layer palette change the blend mode to: Luminance (Legacy)
Effects - Plugins - Xero - Radiance:

Now move the mask layer to the bottom (below both halftone layers)
Keep the layer active.
Effects - Plugins - Richard Rosenman - Scanlines:

Effects - Plugins - Richard Rosenman - Scanlines:

Effects - Plugins - Dsb Flux - Blast: 

Activate the top layer.
Open the main tube, c/p in the canvas and place it in the left side.
Effects - Plugins - Eye Candy 4000 - Shadowlab:

Open: Condom. C/p in the canvas, resize at 35 percent - Smart Size.
Place it in the left bottom corner.

Open: Corset. C/p in the canvas, resize at 45 percent - Smart Size.
Place it in the left bottom, next to the condom.

Open: Candy 1. C/p in the canvas, resize at 55 percent - Smart Size. Twice
Place it in front of the condom.

Open: Flower 2. C/p in the canvas, resize at 50 percent - Smart Size. Twice
Image - Mirror. Place it in front of the corset.

Open: Sex Toy Dice. C/p in the canvas, resize at 50 percent - Smart Size. Twice
Place it in front of the flower.

Open: Sex Toy 5. C/p in the canvas, resize at 40 percent - Smart Size. 
Place it in next to the corset.

Open: Shoe 2. C/p in the canvas, resize at 35 percent - Smart Size. 
Place it in next to rubber duck.

Open: Cupcake 1. C/p in the canvas, resize at 35 percent - Smart Size. 
Place it in next to the shoe.

Open: Heart String 2. C/p in the canvas, resize at 60 percent - Smart Size. 
Place it in the right side.

Open: Sex Toy 2. C/p in the canvas, resize at 45 percent - Smart Size. 
Image - Free Rotate: Right - 30 degrees. Place it above the string.

Open: Nailpolish. C/p in the canvas, resize at 50 percent - Smart Size. Twice
Place it in next to the cupcake.

Open: Cuffs. C/p in the canvas, resize at 45 percent - Smart Size. 
Place it in front of the nailpolish.

Open: Ice Cream. C/p in the canvas, resize at 40 percent - Smart Size. 
Place it in the right botom corner.

Open: Brad. C/p in the canvas, resize at 45 percent - Smart Size. 
Place it in the right top side of the mask. Copy and paste as a new selection, place it below.

Open: Heart 1. C/p in the canvas, resize at 30percent - Smart Size. 
Image - Free Rotate: Right - 15 degrees. Place it in the right side, between the brads.

Sharpen the elements and apply shadow.

Effects - Plugins - Eye Candy 4000 - Shadowlab:

Add the name and copyright info.

To animate:

Copy merged the tag, paste as a new animation. Duplicate until you have 15 frames

Open:  SimoneAni-26_GlitterCloudPink.psd  
Animation - Cull Animation: Remove 1 frame every 2 frames. Twice
Delete the first frame. Activate the first frame, select all. 

Drag the animation into the tag and place it at the bottom.

**Adding a background to the transparent animation.

Animation - Animation Propieties
Change the black color for the color of your choice, mine is white:

Apply and the color will be applied in all the frames selected.

Change the speed to: 13, play the animation and save if you like! :)

30 enero 2013

No rest for the wicked


Supplies Needed:
Psp & Animation Shop
Tube of choice. Art by Screaming Demons, available here
Scrap kit Hallows Eve (PTU) by Sky Scraps here
Animation 135 by Simone here
Mask 146 by Gems here
Plugins:
Eye candy 4000
Font here


Open a new image: 620x550.
Open the paper: SkyScraps-HE-pp1. C/p in the canvas. Resize at 80 percent - Smart Size.
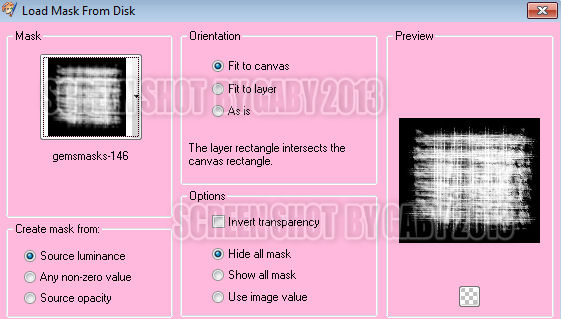
Layers - Load/Save Mask - Load Mask from the disk:

Merge group. Duplicate. Merge visible. Resize at 95 percent - Smart Size. 

Open: SkyScraps-HE-E81. C/p in the canvas. Resize at 60 percent - Smart Size.
Place it in the left side.

Open: SkyScraps-HE-E83. C/p in the canvas, place it in the right side.

Open: SkyScraps-HE-E82. C/p in the canvas, place it in the left side.

Open: SkyScraps-HE-E78. C/p in the canvas. Resize at 70 percent - Smart Size.
Place it in the right side.

Open: SkyScraps-HE-E23. C/p in the canvas. Resize at 70 percent - Smart Size.
Place it in the top right side.

Open: SkyScraps-HE-E6. C/p in the canvas. Resize at 50 percent - Smart Size.
Place it above the tree hole.

Open: SkyScraps-HE-E63. C/p in the canvas. Resize at 70 percent - Smart Size.
Place it in the right side.

Open: SkyScraps-HE-E74. C/p in the canvas. Resize at 40 percent - Smart Size.
Place it in the bottom left. Duplicate. Image - Mirror.

Open: SkyScraps-HE-E36. C/p in the canvas. Resize at 45 percent - Smart Size.
Image - Free Rotate: Right - 25 degrees. Place it in the right side, above the tree hole.

With the magic wand, click inside the left frame and expand the selection: 10 pixels.
Open paper: SkyScraps-HE-pp1. C/p in the canvas, resize at 50 percent - Smart Size.
Selections - Invert. Edit - Clear. Selections - Invert. 

Open the close up of the tube, C/p in the canvas, place it above the paper.
Selections - Invert. Edit - Clear. Deselect.
In the layer palette change the blend mode to: Hard Light.

Open: SkyScraps-HE-E67. C/p in the canvas. Resize at 50 percent - Smart Size.
Place it above the close up, at the bottom and remove any excess outside the frame.

Open: SkyScraps-HE-E8.  C/p in the canvas. Resize at 40 percent - Smart Size.
Place it at the bottom of the frame.

Open: SkyScraps-HE-E68. C/p in the canvas, place it at the bottom and eraser around the grass.

Open: SkyScraps-HE-E80. C/p in the canvas. Resize at 55 percent - Smart Size.
Image - Mirror. Place it in the bottom left.

Open: SkyScraps-HE-E72. C/p in the canvas. Resize at 50 percent - Smart Size. Twice
Place it in the bottom left, next to the skull.

Open: SkyScraps-HE-E51. C/p in the canvas. Resize at 55 percent - Smart Size. Twice
Place it in the left, at the top of the books.

Open: SkyScraps-HE-E69. C/p in the canvas. Resize at 80 percent - Smart Size. 
Place it in the right.

Open: SkyScraps-HE-E61. C/p in the canvas. Resize at 50 percent - Smart Size. Twice
Place it in the bottom right, in front of the mushrooms.

Open: SkyScraps-HE-E42. C/p in the canvas. Resize at 55 percent - Smart Size. Twice
Image - Mirror. Place it in the top of the wood frame.

Open the tube c/p in the canvas and place it in the left side.
Effects - Plugins - Eye Candy 4000 - Shadowlab:

Sharpen the elements and apply shadow.

Effects - Plugins - Eye Candy 4000 - Shadowlab:

Add the name and copyright info.

To animate:

Activate the layer with the close up.
Effects - Artistic Effects - Halftone:

Apply halftone again but change the square size to: 8

Copy merged, Open animation shop and paste as a new animation in animation shop.
Back to psp, undo the effect and apply again and change the size to: 13
Copy merged, in animation shop, paster after current frame. Repeat two more times. (4 frames in total)

Frame 3:
Square size: 7 

Frame 4:
Square size: 4.

Activate the first frame, select all. Copy, click in the last frame and paste after current frame.
Continue until you have 16 frames.

Open:  SimoneAni135.psd  
Activate the first frame, select all. 
Animation - Cull Animation: Remove 1 frame every 3 frames.
Drag the animation into the tag and place it in the bottom right corner of the wood frame.

Activate the first frame, select all. Place it where it belongs to finish the tag.

**Adding a background to the transparent animation.

Animation - Animation Propieties
Change the black color for the color of your choice, mine is white:

Apply and the color will be applied in all the frames selected.

Change the speed to: 14, play the animation and save if you like! :)

One hardcore way

Supplies Needed:
Psp & Animation shop
Tube of choice. Art by Zlata M, find the tube here
Scrap kit Susan (PTU) by Bibis Collections here
Animation 63 by Simone here
Mask 151 & 205 by Gems here
Plugins:
Eye candy 4000
Greg's Factory Output Vol. II
Font here


Open a new image: 650x550

Open: BIBISUSAN PAPERS (4). C/p in the canvas. Resize at 75 percent - Smart Size.
Open: BIBISUSAN ELEMENTS (6). C/p in the canvas. Resize at 50 percent - Smart Size.
Merge visible.
Layers - Load/Save Mask - Load Mask from the disk:

Merge group.  Duplicate. Merge visble.

Open: BIBISUSAN ELEMENTS (79). C/p in the canvas. Resize at 75 percent - Smart Size.
Layers - Load/Save Mask - Load Mask from the disk:

Merge group.  Duplicate. Merge down. Resize at 95 percent - Smart Size.

Open: BIBISUSAN ELEMENTS (67). C/p in the canvas. Resize at 50 percent - Smart Size.
Place it in the bottom left corner. Image - Flip. Image - Mirror. Arrange it in the top right.

Open: BIBISUSAN ELEMENTS (62). C/p in the canvas. Resize at 60 percent - Smart Size.
Image - Flip. Image - Mirror. Place it in the top right.

Open: BIBISUSAN ELEMENTS (42). C/p in the canvas. Resize at 75 percent - Smart Size.
Place it in the bottom left. Duplicate. Image - Mirror. Place it in the right side.

Open: BIBISUSAN ELEMENTS (74).  C/p in the canvas. Resize at 60 percent - Smart Size.
Image - Free Rotate: Right - 15 degrees. Place it above the water splash.

Open: BIBISUSAN ELEMENTS (50). C/p in the canvas. Resize at 50 percent - Smart Size.
Place it in the top left.

Open: BIBISUSAN ELEMENTS (23). C/p in the canvas. Resize at 65 percent - Smart Size.
Place it in the left side, duplicate and move it below and more to the center. 

Open: BIBISUSAN ELEMENTS (38). C/p in the canvas. Resize at 45 percent - Smart Size.
Place it in the top left side, eraser the extra of the string.

Open: BIBISUSAN ELEMENTS (84). C/p in the canvas. Resize at 45 percent - Smart Size.
Place it in the top right.

Open: BIBISUSAN ELEMENTS (8). C/p in the canvas. Resize at 80 percent - Smart Size.
Place it in the bottom of the canvas.

Open: BIBISUSAN ELEMENTS (78). C/p in the canvas. Resize at 65 percent - Smart Size.
Place it in the right side. 

Open: BIBISUSAN ELEMENTS (40). C/p in the canvas. Resize at 80 percent - Smart Size.
Place it in the right side behind the motorcycle.

Open: BIBISUSAN ELEMENTS (33).  C/p in the canvas, place it above  the motorcylcle.
Duplicate . Image - Mirror. place it above and at the bottom of the speaker.

Open: BIBISUSAN ELEMENTS (75). C/p in the canvas. Resize at 65 percent - Smart Size.
Image - Flip. Place it above the motorcycle.

Open the tube c/p in the canvas and place it in the left side.
Effects - Plugins - Eye Candy 4000 - Shadowlab:

Open: BIBISUSAN ELEMENTS (5). C/p in the canvas. Resize at 65 percent - Smart Size.
Place it at the bottom left, next to the tube.

Open: BIBISUSAN ELEMENTS (64). C/p in the canvas. Resize at 70 percent - Smart Size.
Place it at the bottom right side. Duplicate. Image - Free Rotate: Right - 10 degrees.

Open: BIBISUSAN ELEMENTS (39). C/p in the canvas. Resize at 70 percent - Smart Size.
Place it at the bottom right, in the union of the metal tags.

Open: BIBISUSAN ELEMENTS (57). C/p in the canvas. Resize at 35 percent - Smart Size.
Place it at the bottom right, at the top of the tires.

Open: BIBISUSAN ELEMENTS. C/p in the canvas. Resize at 50 percent - Smart Size. Twice
Place it in front of the tires.

Open: BIBISUSAN ELEMENTS (37).  C/p in the canvas. Resize at 45 percent - Smart Size. Twice
Place it at the top of the handcuffs.

Open: BIBISUSAN ELEMENTS (34). C/p in the canvas.  Image - Free Rotate: Left - 90 degrees.
Place it 3 times above the tag.

Sharpen the elements and apply shadow.

Effects - Plugins - Eye Candy 4000 - Shadowlab:

Add the name and copyright info.

To animate:

Close all the layers below the tube. Merge visible all the open layers. Rename it: 1.
close it. Open all the other layers.

Activate the layer:  BIBISUSAN ELEMENTS (42), the one in the right side.
Effects - Plugins - Greg's Factory Output Vol. II - Pool Shadow: 

Copy merged. Open Animation Shop, paste as a new animation, back to psp.
Undo the plugin and apply again but change the first diagonal to:
Diagonal: 66

Copy merged. In animation shop, paste after current frame.
back to psp. Undo the plugin and apply again.
Diagonal: 96

Diagonal: 133

Diagonal: 114

Now you have 5 frames in animation shop. Activate the first frame, select all. 
Copy, click in the last frame and paste after current frame. Continue until you have 20 frames.

Open: SimoneAni63-ShootingSparklesPink.psd
Animation - Cull Animation: Remove 1 frame every 4 frames. 
Delete the first frame.

Drag the animation into the tag and place it at the bottom.
Back to psp, open the layer: 1. 
Copy, go to animation shop, paste as a new animation.
Duplicate until you have 20 frames.

Activate the first frame, select all. Place it where it belongs to finish the tag.

**Adding a background to the transparent animation.

Animation - Animation Propieties
Change the black color for the color of your choice, mine is white:

Apply and the color will be applied in all the frames selected.

Change the speed to: 12, play the animation and save if you like! :)

29 enero 2013

Sexy Chick


Supplies Needed:
Psp & Animation shop
Tube of choice. Art by Sky Scraps, the tube is available here
Scrap kit Sexy Chick 2 (PTU) by SkyScraps here
Animation  pink flower splash  by Lovey here
Plugins:
Eye candy 4000
Font here


Open a new image: 620x500

Open: SkyScraps-SC-E65. C/p in the canvas. Resize at 70 percent - Smart Size. 
Place it in the center.

Open: SkyScraps-SC-E67. C/p in the canvas. Resize at 75 percent - Smart Size. 
Place it in the center, above the halftone element.

Open: SkyScraps-SC-E64.  C/p in the canvas. Resize at 60 percent - Smart Size. 
Place it at the bottom center.

Open: SkyScraps-SC-E15. C/p in the canvas. Resize at 65 percent - Smart Size. 
Place it in the center.

Open the tube c/p in the canvas and place it in the center, resize if it's needed.
Effects - Plugins - Eye Candy 4000 - Shadowlab:

Open: SkyScraps-SC-E3. C/p in the canvas. Resize at 55 percent - Smart Size. 
Image - Free Rotate: Right - 75 degrees. Place it in the bottom center of the frame.

Open: SkyScraps-SC-E51. C/p in the canvas. Resize at 55 percent - Smart Size. 
Place it in the right bottom corner of the frame. Duplicate. Image - Mirror.
Duplicate, again. Image - Free Rotate: Right - 90 degrees. Move it to the bottom center.

Open: SkyScraps-SC-E8. C/p in the canvas. Resize at 45 percent - Smart Size. 
Image - Free Rotate: left - 80 degrees. Place it in the bottom right of the frame.
Duplicate and move it to the center.

Open: SkyScraps-SC-E68. C/p in the canvas. Resize at 45 percent - Smart Size. Twice
Place it in the bottom right of the frame, above the leaves.

Open: SkyScraps-SC-E69. C/p in the canvas. Resize at 50 percent - Smart Size. Twice
Place it in the bottom of the frame, next to the first flower.

Open: SkyScraps-SC-E7. C/p in the canvas. Resize at 50 percent - Smart Size. 
Image - Free Rotate: right - 70 degrees. Place it at the bottom center, above the red flower.

Open: SkyScraps-SC-E45. C/p in the canvas. Resize at 60 percent - Smart Size. 
Image - Free Rotate: left - 75 degrees. Place it at the bottom center. Duplicate. Image - Mirror.

Open: SkyScraps-SC-E59. C/p in the canvas. Resize at 70 percent - Smart Size. 
Image - Free Rotate: right - 90 degrees. Place it at the bottom left.

Open: SkyScraps-SC-E44. C/p in the canvas. Resize at 40 percent - Smart Size. 
Place it in the left bottom corner of the frame.

Open: SkyScraps-SC-E6. C/p in the canvas. Resize at 40 percent - Smart Size. Twice.
Place it in the left bottom, next to the flower in the corner.

Open: SkyScraps-SC-E71. C/p in the canvas. Resize at 40 percent - Smart Size. Twice.
Place it in the bottom center.

Open: SkyScraps-SC-E5. C/p in the canvas. Resize at 45 percent - Smart Size. Twice.
Place it in the bottom right.

Open: SkyScraps-SC-E19. C/p in the canvas. Resize at 55 percent - Smart Size. Twice.
Place it in the bottom left corner.

Open: SkyScraps-SC-E75. C/p in the canvas. Resize at 40 percent - Smart Size. 
Place it in the bottom right corner.

Open: SkyScraps-SC-E47. C/p in the canvas. Resize at 45 percent - Smart Size. 
Place it in the top right corner of the frame.

Open: SkyScraps-SC-E46. C/p in the canvas. Resize at 45 percent - Smart Size. 
Place it in the right side, above the tag. Duplicate. Image - Mirror. Merge down.

Open: SkyScraps-SC-E63.  C/p in the canvas. Resize at 60 percent - Smart Size. 
Place it in above the design.

Sharpen the elements and apply shadow.

Effects - Plugins - Eye Candy 4000 - Shadowlab:

Add the name and copyright info.

To animate: 
Close the bottom layer, halftone element (SkyScraps-SC-E65).
Activate the element: Raindrops. (SkyScraps-SC-E46)

Adjust - Add/Remove Noise - Add Noise:
uniform
36 percent
Monochrome

Copy Merged.  Open animation shop and paste as a new animation in animation shop.
Back to psp, undo the effect and apply again and change the percent to: 45.
Copy merged, paste after current frame. Back to psp, undo the effect and apply again and change the percent to: 40.

Activate the first frame, select all. Copy, click in the last frame and paste after current frame.
Continue until you have 15 frames.

back to psp. Merge the open layers and close it. Open the halftone background and copy merged.
In animation shop, paste as a new animation, duplicate until you have 15 frames.

Open:  pink flower splash by lovey'10.mng
Animation - Cull Animation: Remove 1 frame every 2 frames.
Animation - Rotate: Right - 90 degrees.
Activate the first frame, select all. 

Drag the animation into the halftone background, place it in the right top. 
Back to the animation, undo the drag. Animation - Mirror. 
Drag into the background again and place it in the left top.

Activate the animation with the frame, tube, name, etc.
Activate the first frame, select all. drag into the tag and place it above the animation

**Adding a background to the transparent animation.

Animation - Animation Properties
Change the black color for the color of your choice, mine is white:

Apply and the color will be applied in all the frames selected.

Change the speed to: 13, play the animation and save if you like! :)

Rock Angel


Supplies Needed:
Psp & Animation shop
Tube of choice. Art by Celine Pinup the tube is available here
Scrap kit Rock Angel (PTU) by Toxic Desirez here
Animation pinknwhitestars by Lovey here
Plugins:
Eye candy 4000
Font here


Open a new image: 650x550

Open: Kristin - Rock Angel - Splatter. C/p in the canvas.  Resize at 50 percent - Smart Size.
Image - Mirror. Merge visible. Move it to the top.

Open: Kristin - Rock Angel - Doodle 1.  C/p in the canvas.  Resize at 35 percent - Smart Size.
Place it in the top center. Duplicate. Image - Flip.

Open: Kristin - Rock Angel - Wordart 2. C/p in the canvas.  Resize at 70 percent - Smart Size.
Place it in the center.

Open: Kristin - Rock Angel - Frame 3. /p in the canvas.  Resize at 75 percent - Smart Size.
Place it in the center.

With the magic wand, click inside, expand the selection: 7 pixels.

Open: Kristin - Rock Angel - Paper 5. C/p in the canvas, resize at 70 percent - Smart Size.
Place it below the frame. Selections - Invert. Edit - Clear. Deselect.

Open the tube c/p in the canvas and place it in the center, resize if it's needed.
Duplicate.  Adjust - Blur - Gaussian Blur: 2 pixels. 
In the layer palette change the blend mode to: Overlay. Opacity: 60.
Effects - Plugins - Eye Candy 4000 - Shadowlab:

Open: Kristin - Rock Angel - Discoball. C/p in the canvas, resize at 55 percent - Smart Size. Twice.
Place it in the bottom right, a little behind the tube.

Open: Kristin - Rock Angel - Star Border. C/p in the canvas, resize at 50 percent - Smart Size. 
Place it in the bottom right corner.

Open: Kristin - Rock Angel - Bow 3. C/p in the canvas, resize at 30 percent - Smart Size. 
Place it at the top of the discoball.

Open: Kristin - Rock Angel - String. C/p in the canvas, resize at 40 percent - Smart Size. 
Place it at the bottom of the discoball.

Open: Kristin - Rock Angel - Thorned Heart & Rose. C/p in the canvas, resize at 50 percent - Smart Size. Twice.
Place it in the bottom right corner.

Open: Kristin - Rock Angel - Flower 2. C/p in the canvas, resize at 50 percent - Smart Size. Twice.
Place it in the bottom, next to the discoball.

Open: Kristin - Rock Angel - Heart & Headphones. C/p in the canvas, resize at 55 percent - Smart Size. Twice.
Place it in the bottom center.

Open: Kristin - Rock Angel - Candy 2. C/p in the canvas, resize at 45 percent - Smart Size. Twice.
Place it in the bottom, between the heart and the flower.

Open: Kristin - Rock Angel - Flower 1. C/p in the canvas, resize at 50 percent - Smart Size. Twice.
Place it in the bottom, next to the heart.

Open: Kristin - Rock Angel - Collar. C/p in the canvas, resize at 40 percent - Smart Size. 
Place it in the bottom left.

Open: Kristin - Rock Angel - Bear.  C/p in the canvas, resize at 50 percent - Smart Size. Twice
Place it above the collar.

Open: Kristin - Rock Angel - Cupcake. C/p in the canvas, resize at 45 percent - Smart Size. Twice
Place it above the collar, next to the bear.

Open: Kristin - Rock Angel - Note 1. C/p in the canvas, resize at 50 percent - Smart Size. Twice
Place it behid the bear, in the left side.

Open: Kristin - Rock Angel - Wordart 1. C/p in the canvas, resize at 50 percent - Smart Size. 
Place it at the bottom center.

Sharpen the elements and apply shadow.

Effects - Plugins - Eye Candy 4000 - Shadowlab:

Add the name and copyright info.

To animate: 
First close all the layer below the tube, included the tube layer.
Merge visible the open layers, rename it 1. Close it.

Activate the layer with: Wordart 2.
Duplicate. Activate the original layer.

Effects - Plugins - Eye Candy 4000 - Gradient Glow:


Copy merged, open animation shop and paste as a new animation.
Back to psp, apply again the plugin, but change the:
Glow Width (pixels): 9

Copy merged,in animation shop, paster after current frame. 
Back to psp, undo the glow effect and apply again:
Glow Width (pixels): 12

Repeat two more times and use this numbers for the glow width
Glow Width (pixels): 10

Glow Width (pixels): 8

In animation shop, Activate the first frame, select all. Copy, click in the last frame and paste after current frame.
Continue until you have 15 frames.

Open: pinknwhitestars.mng
Animation - Resize at 75 percent - Bicubic.
Delete the first frame and Activate the first frame. Drag the animation to the tag and place it at the bottom.
Back to psp, open the layer: 1. Copy.

In animation shop, paste as a new animation. Duplicate until you have 15 frames.
Activate the first frame, select all. Drag into the tag and place it where it belongs.

**Adding a background to the transparent animation.

Animation - Animation Propieties
Change the black color for the color of your choice, mine is white:

Apply and the color will be applied in all the frames selected.

Change the speed to: 13, play the animation and save if you like! :)

27 enero 2013

Tempest of a Sinner


Supplies Needed:
Psp & Animation shop
Tube of choice. Art by SkyScraps, find the tube here
Scrap kit Tempest (PTU) by Bibis Collections here
Animation Cas-2Mist by Lovey here
Plugins:
Eye candy 4000
Font here


Open: BIBITEMPEST ELEMENTS (52). C/p in the canvas.  Resize at 70 percent - Smart Size.
Place it in the top of the canvas. Duplicate and place it in the center, duplicate once more and place it 
at the bottom. Merge visible.

Open: BIBITEMPEST ELEMENTS (41). C/p in the canvas and place it in the center.
With the selection tool make a selection around the frame:

Open the paper: BIBITEMPESTPAPERS (4). C/p in the canvas.  Resize at 60 percent - Smart Size.
move the layer below the frame, selections - invert. edit clear. deselect.

Open: BIBITEMPEST ELEMENTS (11). C/p in the canvas.  Resize at 50 percent - Smart Size.
Place it at the bottom of the frame.

Open: BIBITEMPEST ELEMENTS (16). C/p in the canvas, Resize at 60 percent - Smart Size. 
Place it in the right side of the frame.

Open: BIBITEMPEST ELEMENTS (17). C/p in the canvas, Resize at 60 percent - Smart Size. 
Place it in the right top side, below the leaves.

Open: BIBITEMPEST ELEMENTS (36). C/p in the canvas.  Resize at 70 percent - Smart Size.
Place it in the right side of the frame.

Open: BIBITEMPEST ELEMENTS (53). C/p in the canvas.  Resize at 50 percent - Smart Size.
Place it at the right top side of the frame.

Open: BIBITEMPEST ELEMENTS (4). C/p in the canvas.  Resize at 50 percent - Smart Size.
Place it in the center.

Open the tube c/p in the canvas and place it in the right side of the frame.

Effects - Plugins - Eye Candy 4000 - Shadowlab:

Open: BIBITEMPEST ELEMENTS (3). C/p in the canvas. Resize at 45 percent - Smart Size. 
Place it in the left bottom corner.

Open: BIBITEMPEST ELEMENTS (16). C/p in the canvas. Resize at 50 percent - Smart Size. 
Image - Free Rotate: Left - 90 degrees. Place it at the bottom of the tube.

Open: BIBITEMPEST ELEMENTS (30). C/p in the canvas. Resize at 60 percent - Smart Size. 
Place it above the back leaves.

Open: BIBITEMPEST ELEMENTS (48). C/p in the canvas. Resize at 55 percent - Smart Size. 
Place it in the right bottom.

Open: BIBITEMPEST ELEMENTS (35). C/p in the canvas. Resize at 60 percent - Smart Size. 
Place it in the right bottom corner.

Open: BIBITEMPEST ELEMENTS (44). C/p in the canvas. Resize at 40 percent - Smart Size. 
Place it in the right bottom, next to the candels.

Open: BIBITEMPEST ELEMENTS (14). C/p in the canvas. Resize at 30 percent - Smart Size. 
Place it in the right bottom, above the candels.

Open: BIBITEMPEST ELEMENTS (15). C/p in the canvas. Resize at 40 percent - Smart Size. 
Place it at the bottom, above the skulls.

Open: BIBITEMPEST ELEMENTS (29). C/p in the canvas. Resize at 30 percent - Smart Size. 
Place it at the bottom center.

Open: BIBITEMPEST ELEMENTS (33). C/p in the canvas. Resize at 45 percent - Smart Size. Twice
Place it at the bottom left, next to the black flower. Duplicate and place it in the right side.

Open: BIBITEMPEST ELEMENTS (20). C/p in the canvas. Resize at 40 percent - Smart Size. 
Place it in the left bottom.

Sharpen the elements and apply shadow.

Effects - Plugins - Eye Candy 4000 - Shadowlab:

Add the name and copyright info.

To animate: 
Activate the layer with the moon (BIBITEMPEST ELEMENTS17). 
Effects - Plugins - Eye Candy 4000 - HSB Noise:

Copy merged. Open animation shop and paste as a new animation in animation shop.
Back to psp, undo the effect and apply again and change the random seed.
Copy merged, in animation shop, paster after current frame. Repeat three more times. ( 5 frames in total)

Activate the first frame, select all. Copy, click in the last frame and paste after current frame.
Continue until you have 20 frames.

Open:  Cas-2Mist-bylovey'12.psd
Activate the first frame, select all. Animation - Resize at 70 percent.
Drag the animation into the tag and place it above the center.

**Adding a background to the transparent animation.

Animation - Animation Propieties
Change the black color for the color of your choice, mine is white:

Apply and the color will be applied in all the frames selected.

Change the speed to: 15, play the animation and save if you like! :)