31 octubre 2012

No words are needed between us


Supplies Needed:
Psp 
Tube of choice. Art by Angelica Sellers, purschase it here
Scrap kit (PTU) The Witches Brew by Kirstys Scraps here
Plugin: Toadies
Eyecandy 4000
Font here


Open a new image: 630x600. 

Open: KISM-TheWitchesBrew-BarbedWire. c/p in the canvas, resize at 75 percent - Smart Size.
Place it in the top of the canvas. Duplicate. Free Rotate: Right - 90 degrees. Merge visible:

Duplicate. Image - Mirror. Image - Flip. Merge visible

Add a new layer. Selections - Select All.
Open paper: KISM-TheWitchesBrew-Paper7. Copy, paste into selection. Deselect.
Activate the barbedwire frame, with the magic wand click inside. 
Selections - Modify - Expand: 2 pixels.
Activate the paper layer. Selections - Invert. Edit - Clear. Deselect.
Duplicate the paper layer. 
Adjust - Blur - Gaussian Blur: Radius 10 pixels.
Effects - Plugins - Toadies - Blast 'em:

Move the layer below the original paper.

Open: KISM-TheWitchesBrew-Stairs. c/p in the canvas, place it in the bottom center of the canvas.

Open: KISM-TheWitchesBrew-Tomb. c/p in the canvas, resize at 60 percent - Smart Size.
place it in the right bottom corner.

Open: KISM-TheWitchesBrew-BlackRose. c/p in the canvas, resize at 50 percent - Smart Size.
Free Rotate: Right - 30 degrees. Place it behind the stairs layers,  in the right side.
Duplicate. Image - Mirror.

Open: KISM-TheWitchesBrew-Candles. c/p in the canvas, resize at 40 percent - Smart Size.
Place it at the bottom of the tomb.

Open: KISM-TheWitchesBrew-Goblet. c/p in the canvas, resize at 25 percent - Smart Size.
Place it next to the candles.

Open:  KISM-TheWitchesBrew-Charm2. c/p in the canvas, resize at 35 percent - Smart Size.
Place it next to the globet.

Open: KISM-TheWitchesBrew-Gargoyle. c/p in the canvas, resize at 40 percent - Smart Size.
Place it in the left bottom side.

Open: KISM-TheWitchesBrew-Flower2. c/p in the canvas, resize at 30 percent - Smart Size.
Place it at the bottom of the gargoyle.

Open: KISM-TheWitchesBrew-Angels. c/p in the canvas, resize at 30 percent - Smart Size.
Place it next to the roses.

Open: KISM-TheWitchesBrew-Charm1. c/p in the canvas, resize at 45 percent - Smart Size.
Place it in the left top corner of the frame. Duplicate. Image - Mirror.

Add more elements:
KISM-TheWitchesBrew-Fog
KISM-TheWitchesBrew-Lightning
KISM-TheWitchesBrew-Star
KISM-TheWitchesBrew-Tombstone1

Sharpen the elements and apply shadow.
Effects - Plugins - Eyecandy 4000 - Shadowlab:

Open the tube, c/p in the canvas, resize if it's needed.
Place it in center of the tag.

Effects - Plugins - Eye Candy 4000 - Shadowlab:

Add copyright and your name. Merge Visible, copy and paste as new image. Export as a png or jpg.

29 octubre 2012

Without your love


Supplies Needed:
Psp and animation shop

Tube of choice. I am using one by Arthur Crowe. It's a bonus tube, free with $10 of purchase: here 
Forum set 016 by me PSP here PSD  here
Plugin: Eye candy 4000
Font here


Open the template. Duplicate and close the original file.
Delete the layer: credits

Activate the background layer.
Effects - Plugins - Eye candy 4000 - Marble:

Make a gradient with two  colors from your tube:
My choice:

Foreground: #4b2d21
Background: #90685a

Style: Linear
Angle: 0
Repeats: 1
Invert: unchecked

Activate the layer: rectangle 1 background.
Selections - All float - Defloat. 
Add a new layer, floodfill with the gradient. Deselect.
Effects - Reflection effects - FeedBack:

Remove any excess outside the frame.

Effects - Texture Effects - Fine Leather:

Duplicate. Image - Mirror. 
Arange it behind the top right rectangle.
delete the layer: rectangle 2 background

Activate the layer: rectangle frames.
Selections - All float - Defloat. 
Add a new layer, floodfill with the gradient. 
Deselect and delete the original layer.

Add drop shadow:
V: 0 H: 0
O: 100 B: 5

Apply twice.

Activate the layer: lines.
Selections - All float - Defloat. 
Add a new layer, floodfill with a dark color: #4b2d21. 
Deselect and delete the original layer.

Effects - Texture Effects - Blinds:

Add drop shadow:
V: 3 H: 3
O: 80 B: 4

Activate the layer: wordart mini.
Selections - All float - Defloat. 
Add a new layer, floodfill with the color: #ad9b77
Deselect and delete the original layer.

Activate the layer: wordart
Selections - All float - Defloat. 
Add a new layer, floodfill with the color: #90685a.
delete the original layer.

Add a new layer. 
Effects - 3D effects - Cutout:

Deselect and activate the text layer.
Add drop shadow:
V: 1 H: 4
O: 75 B: 7

Add your name and copyright.

To animate:
Open (if it's closed) the layer: blinkie 1
Activate the layer: Background

Effects - Distortion Effects - Ripple

Copy merged. Open animation shop and paste as a new animation.
Back to psp, undo the ripple, apply again but change:
Settings
Amplitude: 10
Wavelength: 48

hide the layer: blinkie 1 and open the next (blinkie 2), copy merged, paste after current frame in animation shop.
Back to psp,undo the ripple effects, apply for the last time:
Settings
Amplitude: 11
Wavelength: 54

hide: blinkie 2 and open the layer, blinkie 3. Copy merged, in animation shop, paste after current frame.
Change the speed to: 13 
You're done!

25 octubre 2012

Free Extras: Floral Seduction


ღ  Teaser Alert ღ 

ღ New tag created with a gorgeous tube by Roman Zaric
The tube it's going to be released soon at: http://romanzarictubes.com/

ღ  Free set of extras, download here


Free Extras: Ritual


ღ Non animated set of extras, download here

ღ Art by SkyScraps

ღ Scrap Blessed by Inzpired Creationz


Free Extras: Blessed be


ღ Non animated set of extras, download here

ღ Art by Anna Marie 

ღ Scrap Blessed Be by Inzpired Creationz


Lake Princess


Supplies Needed:
Psp & Animation Shop
Tube of choice. Art by SkyScraps, purschase it here
Scrap kit (PTU) Witchy Woman by Inzpired Creationz here
Eyecandy 4000
Font here


Open a new image: 620x600

Open: Lake. c/p in the canvas, resize at 70 percent - Smart Size.
Place it in the center.

Activate the rectangle tool:

Foreground color: black (#000000)
Background: none

Make a rectangle around the lake, like this:

Effects - Plugins - Eye Candy 5 Impact - Chrome:


With the magic wand click inside. Selections - Modify - Expand: 5 pixels.

Open paper: 4. C/p in the canvas, resize at 65 percent - Smart Size.
Send the layer to the bottom. Remove any exces outside the frame.

Open: Sparkles 3. c/p in the canvas, resize at 75 percent - Smart Size.
Place it in the left side, in the half center. 
In the layer palette, change the blend mode to: Luminance.

Open: crystal ball. C/p in the canvas, resize at 50 percent - Smart Size.
place it in the right bottom corner of the rectangle, above the lake.

Open: Bottle 4. C/p in the canvas, resize at 20 percent - Smart Size.
place it next to the crystal ball. 

Open: Bella Donna. C/p in the canvas, resize at 25 percent - Smart Size.
place it next to the bottle. 

Open the tube, c/p in the canvas, resize if it's needed.
Place it in the left side of the tag.

Effects - Plugins - Eye Candy 4000 - Shadowlab:

Open: Sparkles 2.  C/p in the canvas, resize at 75 percent - Smart Size.
Image - Free Rotate: Left - 50 Degrees

Open: Lantern. C/p in the canvas, resize at 35 percent - Smart Size.
Place it in the top right of the rectangle. Paste again and resize at 30 percent.
Place it more to the left side.

Open: Stones. c/p in the canvas, resize at 30 percent - Smart Size.
Place it in the bottom left side of the rectangle.

Open: Bottle 3. c/p in the canvas, resize at 20 percent - Smart Size.
Image - Mirror. Place it in next to the stones. 

Add more elements:
crystal 2
Flower 2

Sharpen the elements and apply shadow.
Effects - Plugins - Eyecandy 4000 - Shadowlab:

Add copyright and your name.

To animate:

Grab the freehand selection tool:

Activate the layer layer and make a selection around the water. Copy

Open animation shop, paste as a new animation.
Effects - Insert Image Effects:


Delete the first frame.

back to psp, close the paper layer, the sparkle and the lake layer. Merge visible all the open layers.
Copy and paste as a new animation in animation shop. Duplicate until you have 14 frames.
Back to psp and close the merged layer and open the rest, copy merged.

Go to animation shop, paste as a new animation. Duplicate until you have 14 frames.
Activate the first frame, select all. Drag the animated lake into the tag, carefully and place it where it belongs.

Activate the animation with the tube, frame, name, etc. Drag into the main tag and place it above.
Change the speed to 16. 

**Adding a background to the transparent animation.

Animation - Animation Propieties
Change the black color for the color of your choice, mine is white:

Apply and the color will be applied in all the frames selected :)
If you like  it save and you're done.

Play the animation if you like it save :) 

22 octubre 2012

Clusters: Blessed Be


ღ Freebies Cluster scene and cluster frames

ღ Scrap Blessed Be by Inzpired Creationz here

ღ PSP and PSD files.

 DOWNLOAD


 DOWNLOAD

21 octubre 2012

Tutorial Result: BOOOlicious

Tutorial result by Brigitte of one of my latest tutorials called: BOOOlicious :)
Thank you so much for sharing your result with me, it's truly appreciated ♥

**Click on the tag to see it in real size**

Extras: Emo Halloween


ღ Non animated set of extras, download here

ღ Art by SkyScraps

ღ Scrap Monsterland by Bibis Collection


Extras: Monster hand


ღ Non animated set of extras here

ღ Art by Arthur Crowe 

ღ Scrap Monsterland by Bibis Collection


Freebie Clusters: Monsterland


ღ Freebies Cluster frames and scene

ღ Scrap Sexy Witch by Bibis Collection: here

ღ PSP and PSD files.

Free extras and tag: He's the damned


ღ Non animated set of extras here

ღ Bonus Tube from Arthur Crowe http://www.arthurcrowesfactory.com/store/

ღ Kit Goth by Bibis Collection


Extras: Uncontrollable thirst


ღ Non animated set of extras here

ღ Tube is one of the bonus from Arthur Crowe and matching scrapkit :) http://www.arthurcrowesfactory.com/store/


19 octubre 2012

Enchanted Night


Supplies Needed:
Psp and Animation Shop.
Tube of choice. Art by Barbara Jesen, purchase it here
Scrap kit (PTU) Enchanted Night by Bibis Collection here
Eyecandy 4000
Dsb Flux
Mura's Meister Copies
Font here

Open a new image: 600x500

Activate the rectangle tool:

Foreground: #000000
Background: none

Make a rectangle in the canvas:

Convert to a raster layer. 
With the magic wand click inside. 
Selections - Modify - Expand: 5 pixels.

Open the paper: BIBI ENCHANTED NIGHTPAPERS (2). c/p in the canvas. 
Resize at 50 percent - Smart Size. Move the layer below the rectagle.

Open the tube, c/p in the canvas, place it inside the rectangle.
Selections - Invert. Edit - Clear. Do the same for the paper layer.

Deselect.
Activate the tube layer.
Effects - Plugins - Xero - Radiance.

Merge Visible. Place it in the center of the canvas.

Duplicate. Activate the original

Effects - Plugins - Muras Meister - Copies:

Open: BIBIENCHANTEDNIGHT ELEM (60). c/p in the canvas.
Resize at 50 percent - Smart Size. Place it at the bottom of the rectangle.

Open: BIBIENCHANTEDNIGHT ELEM (49). c/p in the canvas.
Resize at 30 percent - Smart Size. Place it in the  top left border of the rectangle.
Copy and paste as a new selection, now place it at the bottom of the left side.

Open: BIBIENCHANTEDNIGHT ELEM (23). c/p in the canvas.
Resize at 50 percent - Smart Size. Place it in the left side.

Open: BIBIENCHANTEDNIGHT ELEM (26). c/p in the canvas.
Resize at 50 percent - Smart Size. Place it above the tower.

Open: BIBIENCHANTEDNIGHT ELEM (12). c/p in the canvas.
Resize at 20 percent - Smart Size. Place it behind the cat's hand.

Effects - Plugins - Eyecandy 4000 - Shadowlab:

Apply shadow to the elements of choice.

Add the copyright info and your name.
You're done!

**Optional, to animate the web with Dbs Flux - Bright Noise:
Frame 1 settings:

Frame 2: Intensity: 40

Frame 3: Intensity: 33

Kitty


Supplies Needed:
Psp and Animation Shop
Tube of choice. Art by KiwiFireStorm. Purchase the tube: here
Forum set 015 by me PSP here PSD  here
Plugin: 
Penta .com - Dot and Cross
FunHouse
Eye candy 4000
DSB Flux
Font here


Open the template. Duplicate the file and close the original.

Activate the layer: bg 1
selections - all - float - defloat.

Floodfill with a color of choice. I've used: #efd9ea.
Background color: #cf98a9.

Effects - Plugins - Funhouse - Cirquelate:

Duplicate the layer. Blur - Motion Blur:

In the layer palette change the blend mode to: lighten.
Merge down the layers.

Activate the layer: bg 2
selections - all - float - defloat.

Floodfill with a color of choice. I've used: #a0d1ca.

Effects - Texture Effects - Blinds:

Effects - Artistc Effects - Halftone:

Deselect.

Activate the layer: bg 3.
selections - all - float - defloat.

Floodfill with a color of choice. I've used: #efd9ea.
Adjust - Add Noise:

gaussian
30 percent
Monochrome

Effects - Plugins - Penta .com:

Open the tube, copy and paste above each one of the backgrounds. Remove the excess.
**Optional, apply Xero - Radiance: default settings.

Bg 1: blend mode: Multiply

Bg 2: blend mode: Luminance

Bg 3: blend mode: normal


Open the tube, c/p in the canvas, resize if it's needed.
Place it in left side. Move the layer above the background.

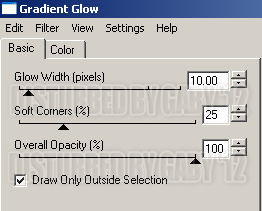
Effects - Plugins - Eye candy 4000 - Gradient Glow:


Activate the layer: frame.
selections - all - float - defloat.

Floodfill with a color of choice. I've used: #d9eeeb.
Adjust - Add Noise:

Random
70 percent
Monochrome

Apply gradient glow but change the width to: 4 pixels.
Add drop shadow:
V: 2 H: 4
O: 30 B: 5

Make a gradient with two  colors from your tube:

Foreground: #d8ebe8
Background: #7dc1b6

Style: Linear
Angle: 0
Repeats: 2
Invert: unchecked

Add the copyright info and your name.

Activate the layer: Background. Floodfill with the gradient.
Adjust - Add Noise:

Uniform
50 percent
Monochrome

Effects - Distortion Effects - Pixelate:

To animate.

Effects - Plugins - Dsb Flux - Blast:

Copy merged. Open Animation shop.
Paste as a new animation. Back to psp, undo the effect and apply again
but change the absolute to : 50.

Copy merged, in animation shop. paste after current frame.
Repeat one more time, but change the absolute to : 40.

Select all the frames. Change the speed to: 20.
Play the animation, if you like it, save!
You're done :D

Another version, just for fun :)