19 agosto 2012

Secrets of a fae


Supplies Needed:
Psp
Tube of choice. Art by Terry Heuser from TPSPP. Purchase it: here
Photo Texture by Dees'Sign Depot here
Animation 76 by Simone here
Xero: Fritillary here
Font here


Open a new image: 600x200.

Open: Texture 3. C/p in the canvas, select the part you like
Resize if needed. I chose the bottom. Remove the excess.  

Add a new layer. Selections - All. Float. Defloat.

Selections - Modify - Contract by: 5 pixels.
Floodfill with black. 

Selections - Modify - Contract by: 1 pixel.
Edit - Clear. Or press Supr in your keyboard.

Selections - Modify - Contract by: 5 pixels.
Floodfill with black. 

Selections - Modify - Contract by: 1 pixel.
Edit - Clear. Or press Supr in your keyboard.

Repeat one more time and you will have 3 inner frames.
I like it blured so, Duplicate the layer.

Adjust - Blur - Gaussian Blur:
Radius: 1 pixel

Merge down. Change the blend mode to: Overlay.
Effects - Plugins - Xenofex 2 - Constellation:

Activate the texture layer.
With the selection tool make a selection around the inner frame.

Like this:

Copy, add a new layer. Paste into selection. 

Effects - Plugins - Xero - Fritillary:

In the layer palette, change the blend mode to: Lighten, change the opacity between: 50 - 70.

Open the tube, c/p in the canvas, place it in the right side.
Duplicate.
Adjust - Blur - Gaussian Blur:
Radius: 3 pixel

In the layer palette, change the blend mode to: Overlay, change the opacity to: 60.
Merge down.

Add your name, copyright and a border. 

To animate:

Close all the layers above the inner frames. 
Copy merged the open layers. Go to animation shop.
Paste as a new animation. Duplicate until you have 21 frames.

Open: SimoneAni76-TheBlingSeries-006.psd
Resize if you want. I have resized it to: 70 percent (Smart Size)

Select all the frames and drag it to your first animation. Place it in the center.

Back to psp. Close the background, inner frames, inner texture layers.
Open the rest (tube, copyright, frame, name). Copy Merged.

Paste as a new animation in Animation Shop. Duplicate until you have 21 frames.

Activate the first frame and select all. Carefully drag it into the first frame of the main animation.
Play the animation. If you like save and you're done.

18 agosto 2012

Dangerous Curves


Supplies Needed:
Psp
Tube of choice. Art by Roman Zaric. Purchase it: here
Plugin: tramages - two the line 
Eye Candy 4000 - HSB Noise
Font here


Open a new image: 600x200
Open the tube, select two colors and make a gradient:

My choice:
Foreground: #26a32d
Background: #d0f7a3

Style: linear
Angle: 0
Repeats: 0
Invert: unchecked

Floodfill the canvas with the gradient.

Effects - Plugins - Eyecandy 4000 - HSB Noise:

Effects - Texture Effects - Blinds:

Effects - Plugins - Tramages - Two the line:

Duplicate. Adjust - Blur - Gaussian Blur:
Radius: 3

In the layer palette, change the blend mode to: Hard Light.
Merge visible.

Open the tube, c/p in the canvas. Resize and place it in the canvas.
Duplicate. Adjust - Blur - Gaussian Blur:
Radius: 3

In the layer palette, change the blend mode to: Overlay.
Merge down.

Add a new layer and activate the selection tool:

And make two rectangles in the top left side.
Make the first, hold the shift key and make the second:
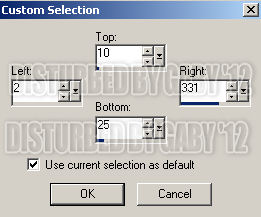
This are the exact size from mine:

and

Apply drop shadow:
V: 0 H: 2
O: 100 B: 10

Deselect.

Duplicate the layer. Image - Mirror. Image - Flip. 
Apply the same shadow to the tube.

Add a border, copyright and your name.

To animate:

Select the background layer.

Effects - Plugins - Eyecandy 4000 - HSB Noise:

Edit - Copy Merged. 
Open Animation Shop and paste as a new animation.

Back to psp. Edit undo the last effect applied.
apply HSB Noise but change the random seed by clicking in the button.
Copy merged, in AS paste After current frame. 
Repeat 1 or 3 more times. Until you like it.
Change the animation speed to: 15 Enter)
If you like it save as gif.
You're done! :)

17 agosto 2012

VIP Party


Supplies Needed: 
PSP 
Tube of choice. I am using one by Celineart PP for PFD. Find her art: here
Cluster frame by me made with the scrap It's my party by Inzpired Creationz: here
Mask 133 by Weescotslass here
Plugin: Xenofex  2 
Font here


Open the cluster. Duplicate the file and resize.
Delete the credits layer.

Add a new layer and sent to the bottom. 
Open the tube you want to use. Select two colors and make a gradient.
My choice:

Foreground: #f9eebd
Background: #43230a

Style: linear
Angle: 45
Repeats: 0
Invert: unchecked

Floodfill the background with the gradient.
Adjust - Add/Remove Noise - Add Noise: 
Random
10 percent
Monochrome

Effects - Distortion Effects - Pixelate:
Block width: 3
Block height: 3
Symmetric: Checked

Add noise again, two times. Same settings used.

Effects - Texture Effects - Mosaic Antique:

**Optional
Effects - Plugins - Xenofex 2 - Constellation:

Duplicate the background layer.

Adjust - Blur - Gaussian Blur:
Radius: 2

In the layer palette, change the blend mode to: Hard Light.

Now, don't merge the layers yet! well you can, but if you want to add a closeup 
follow this steps:

Open the closeup, c/p in the canvas, place it and resize if needed. 
In the layer palette, change the blend mode to: Darken.

With the closeup layer active, right click in the layer palette, merge down.
It will look like this:
I like it this way because the face is almost transparent.

here's how it will look if you don't change the blend mode but merge down, it will look this way:

Result:

Layers - Load mask: WSL_Mask133

Merge group. 

Open the main tube, c/p in the canvas, place it where you want.
Add drop shadow:
V: -2 H: 3
O: 45 B: 9

Add copyright and your name. Merge Visible, copy and paste as new image. Export as a png or jpg.

Extras: A night to remember


A set of extras made with my cluster from the kit: It's my Party by Inzpired Creationz and the art of Jose Cano.
Download the extras here


Cluster and cluster frame: It's my party


Made with the kit: It's my party by  Inzpired Creationz. You can find the kit here
The files are in PSD and PSP
thanks for looking (=

**new link here DOWNLOAD

DOWNLOAD

**new link here DOWNLOAD

16 agosto 2012

Teaser Tag: Roman Zaric


♥ Teaser Alert ♥
Tag by me with a gorgeous tube by Roman Zaric, the tube is special because it comes with another tail of a snake :D
The tube it's going to be released soon at: http://romanzarictubes.com/store/index.php?route=common/home


Naughty Student


Supplies Needed:
Psp
Tube of choice. Art by SkyScraps at SATC, pruchase it here
Scrap kit (PTU) Colorful School  part of a collab by Bibis Collection: here
Font here


Open a new image: 650x450

Open:BIBI COLORFUL SKOOL ELEMENTS (56). C/p in the canvas, resize at 40 percent (smart size).
Place it in the left side of the canvas.

Duplicate. Resize at 80 percent (smart size). 
Image - Free Rotate:
Right
20 degrees

Image - Mirror. Move the layer below the original, arrange it.

Open the close up of the tube, C/p in the canvas. Resize if needed. Place it in the right side above the background.
With the lasso tool make a selection around the inner frame. Selections - Invert. Edit - Clear.
Deselect. In the layer palette, change the blend mode to: Luminance and low the opacity to: 30.

Open the main tube, c/p in the canvas place it in the center of the image. Resize if it's needed.

Open: BIBI COLORFUL SKOOL ELEMENTS (67). C/p in the canvas, resize at 50 percent (smart size).
Move the layer below the tube, place it almost in the center of the image.
Open: BIBI COLORFUL SKOOL ELEMENTS (44). C/p in the canvas, resize at 55 percent (smart size). Two times.
Place it in the top of the two frames.

Add more elements the tag:
BIBI COLORFUL SKOOL ELEMENTS (39)
BIBI COLORFUL SKOOL ELEMENTS (43)
BIBI COLORFUL SKOOL ELEMENTS (52)
BIBI COLORFUL SKOOL ELEMENTS (57)
BIBI COLORFUL SKOOL ELEMENTS (63)
BIBI COLORFUL SKOOL ELEMENTS (65)
BIBI COLORFUL SKOOL ELEMENTS (68)
BIBI COLORFUL SKOOL ELEMENTS (73)
BIBI COLORFUL SKOOL ELEMENTS (74)
BIBI COLORFUL SKOOL ELEMENTS (76)


Always: Resize, sharpen and place as desire. 
Add drop shadow:
V: -1 H: 2
O: 50 B: 6

Add copyright and your name. Merge Visible, copy and paste as new image. Export as a png or jpg.

Extras: Waiting for you


A set of extras made with my cluster from the kit: Dazzling by Bibis Collection and a PP from PFD.
Download the extras here

Extras: Dazzling Summer


A set of extras made with a cluster from the kit: Dazzling by Bibis Collection and the art of  Verymany from PFD.
Download the extras here

Extras: Catrina in love

A set of extras made with my cluster from the kit: Dazzling by Bibis Collection and the art of  Di Mary from PFD.
Download the extras here