Made with the kit: Hard Love by Bibi's Collections You can find the kit here


07 enero 2012
Amore Mio

Supplies Needed:
PSP
Tube of choice. I am using one by Lady Mishka. You can purchase her tubes here
Scrap Amore by Bibi's Collections You can find the kit here
Cluster frame by me: here
Mask 8 by: Gems Taggin Scraps: here
Plugin Eyecandy 4000 glass
Font of choice
Open the cluster frame. Duplicate and close the original image.
Resize and crop a little if you want. Eliminate: Raster 2
Activate: Raster 3.
Selections - Select All - Float - Defloat.
Open the paper @papers (3), Copy - Paste, as a new layer.
Selections -Invert. Edit - Clear. Selections -Invert.
Copy the closeup of the tube, arrange it under the left frame.
Selections -Invert. Edit - Clear. Do the same for the right frame and Deselect.
Adjust - Hue and Saturation - Colorize:
Hue: 0
Saturation: 0
In the layer palette change the blend mode to: Overlay. (both closeup layers)
Select the paper layer:
Adjust - Add/Remove Noise - Add Noise:
Random
1 percent
Monochrome.
Add a new layer, send to bottom. Selections - Select All.
Open the paper @papers (2), Copy - Paste into selection.
Layers - Load mask: gemsmask8 - Merge group.
Select the frame layer.
Activate the text tool, write a pharse of your choice, mine:
AMORE MIO
font: impact
Size: 72
Color: #b80201 (my choice)
Create as a vector
Objects - Align - Horz. center in canvas

Select the pick tool (letter k) and strech the text horizontally (clicking in the nodes), like this:

Convert
Move the text a little to the right side. Duplicate the layer. Select the original text layer:
Adjust - Brightness and Contrast - Brightness/Contrast:
Brightness: -125
Contrast: -50
Activate the duplicate text layer, and move it to the left side until you like it.
Effects - Plugins - Eye candy 4000 - Glass:


Effects - Texture Effects - blinds:
Width: 3
Opacity: 27
Color: black
Horizontal: checked
Light from left/top: unchecked
Effects - Texture Effects - Mosaic Antique:

Apply shadow:
V: 0 H: 3
O: 45 B: 6
Select the original text layer and apply shadow:
V: -1 H: 4
O: 60 B: 5
Open - Copy - Paste your tube as new layer. Resize if need it.
Move it to the center of your tag.
Apply shadow:
V: -1 H: 4
O: 30 B: 7
Now finish decoration your tag with elements from the kit. My choice:
BC Amore (6)
BC Amore (11)
BC Amore (19)
BC Amore (28)
BC Amore (29)
BC Amore (35)
BC Amore (55)
BC Amore (57)
Apply shadow:
V: 0 H: 2
O: 55 B: 4
Add your name and copyright. info. Merge visible. Copy, paste as new image
Save as png or jpg.
You're done with it!!
06 enero 2012
Freebie Cluster and Cluster frame: Amore
Made with the kit: Amore by Bibi's Collections You can find the kit here


31 diciembre 2011
Freebie Cluster and Cluster Frame Happy 2012
thanks for looking (=
***click in the preview to see it in original size***


29 diciembre 2011
Freebie Cluster and Cluster Frame New Year
A set of cluster and cluster frame made with the kit: Kiss me at Midnight by Bibi's Collections You can find the kit here
thanks for looking (=


Waiting for a midnight kiss

Supplies Needed:
PSP
Scrap Kiss me at midnight (PTU) by Bibi. You can see it here
Mask 106 by Weescotslass here
Font here
Open a new image: 600x600
Open the paper: @papel (14). Copy - Paste, as a new layer.
Layers - Load mask: WSL_Mask106 - Merge group.
Open the closeup of the tube. Copy - Paste, as a new layer. Arrange it in the center.
Load and apply the mask again.
Adjust - Blur - Gaussian Blur:
Radius: 2
In the layer palette: Change the blend mode to: Overlay. Opacity: 80
Effects - Texture Effects - Rough Leather:

Open the tube, resize if needed. Place it in the right part of your canvas.
Apply Drop shadow:
v: 0 H: 5
O: 45 B: 6
Open: Kiss @Mnight Bibi (20). Copy - Paste as a new layer. Resize at 70 - Smart Size.
add all the elements you want to finish your tag. I've used the following elements:
Kiss @Mnight Bibi (15)
Kiss @Mnight Bibi (24)
Kiss @Mnight Bibi (25)
Kiss @Mnight Bibi (33)
Kiss @Mnight Bibi (40)
Kiss @Mnight Bibi (47)
Kiss @Mnight Bibi (49)
Kiss @Mnight Bibi (58)
Kiss @Mnight Bibi (64)
Kiss @Mnight Bibi (65)
Open, Copy - Paste, as a new layer, Sharpen after resize these elements.
Drop shadow:
v: 2 H: 2
O: 40 B: 5
Add the copyright info and your name. Merge visible. Copy, paste as new image. Save as png or jpg.
You're done with it!!
13 diciembre 2011
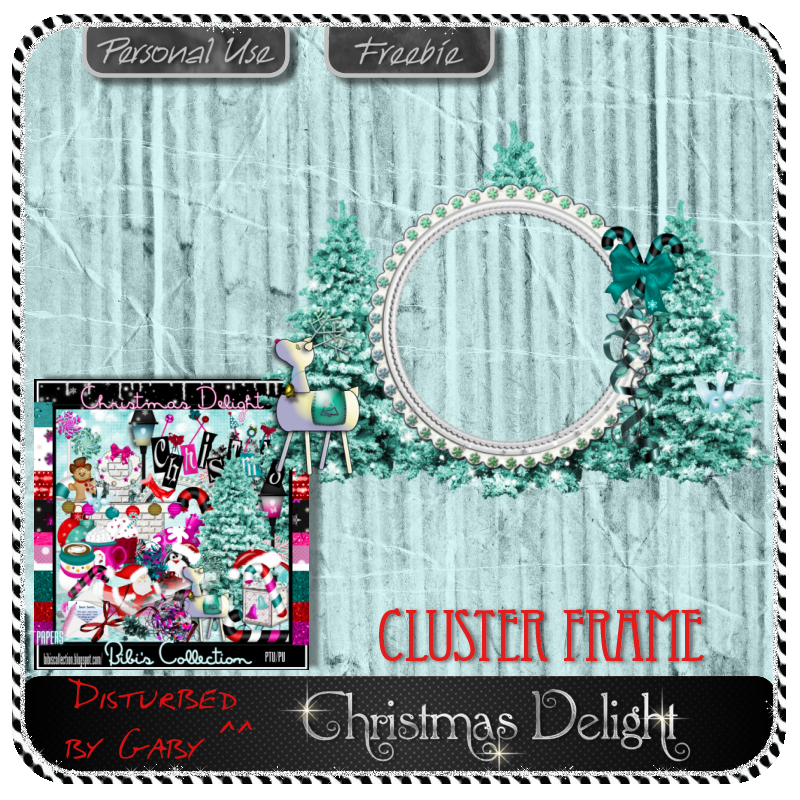
Freebie Cluster n Cluster Frames
My first set of cluster and clusters frames made with the kit: Christmas Delight by Bibi's Collections You can find the kit here
thank you for looking (=
***click in the preview to see it in original size****


11 diciembre 2011
Santa's lil Helper
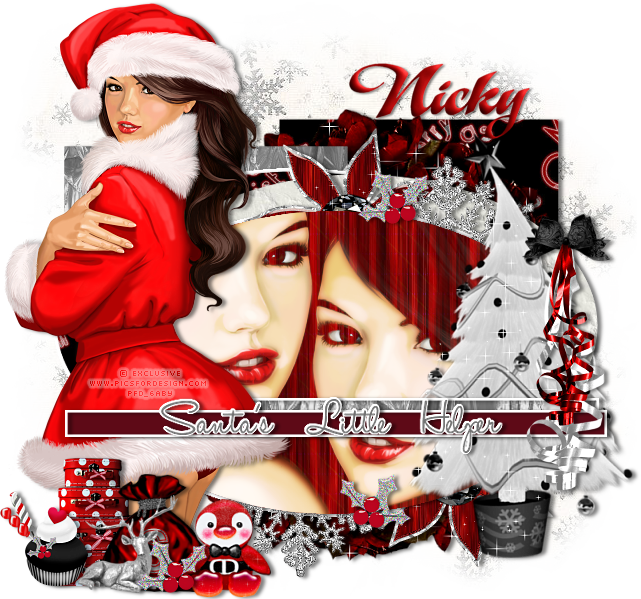
Supplies Needed:
PSP
Exclusive Scrap Christmas in the City (FTU) by Nicky.
You need to register at SATC forum to download
Template by Leah from Gimptactic Tuts here
Mask by Vaybs from: Creative Misfits here
Xero Plugin here
Font here
Open the template, Shift + D, close the original.
Delete the layers:
credit
top dots
bottom dots
stars 1
stars 2
lrg star 1
lrg star 2
Image - Resize at 85 - Bicubic.
Select the crop tool and apply with these settings:
width: 595
height: 515
Image - Canvas Size: 650x600
placement: center
Select the background layer and floodfill with white of delete.
Open Paper 9, Copy - Paste, as a new layer.
Layers - Load mask: DBVMisfitmask4 - Merge group.
Activate the layer: square 2. Selections - Select All - Float - Defloat.
Open: Paper 2. copy- paste as a new layer. Resize at 70 - Smart size.
Selections - Invert. Edit - Clear. Deselect and delete the original layer.
Activate the layer: square 1. Selections - Select All - Float - Defloat.
Open: Paper 11. copy- paste as a new layer. Resize at 70 - Smart size.
Selections - Invert. Edit - Clear. Deselect and delete the original layer.
Activate the layer: oval 4. Selections - Select All - Float - Defloat.
Open: Paper 2. copy- paste as a new layer. Resize at 70 - Smart size.
Selections - Invert. Edit - Clear. Deselect and delete the original layer.
Activate the layer: oval 3. Selections - Select All - Float - Defloat.
Open: Paper 12. copy- paste as a new layer. Resize at 70 - Smart size.
Selections - Invert. Edit - Clear. Deselect and delete the original layer.
Activate the layer: oval 1. Selections - Select All - Float - Defloat.
Open: Paper 10. copy- paste as a new layer.
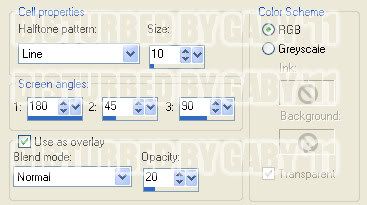
Effects - Artistic Effects - Halftone:
Selections - Invert. Edit - Clear. Deselect and delete the original layer.
Open the closeup of your tube. copy- paste as a new layer. Resize if is needed.
Arrange it in the place of your choice.
Effects - Plugins - Xero - Radiance:
Default settings.
In the layer palette change the blend mode of the layer to: Lighten. Duplicate. Image - Mirror.
Select the oval layer. Selections - Select All - Float - Defloat. Activate the close up layer.
Selections - Invert. Edit - Clear. Selections - Invert. select the duplicate and do the same.
Activate the layer: thin rect 2. Selections - Select All - Float - Defloat.
Open: Paper 11. copy- paste as a new layer. Resize at 70 - Smart size.
Selections - Invert. Edit - Clear.Deselect and delete the original layer.
Activate the layer: words. Adjust - Hue and Saturation - Colorize:
Hue: 0
Saturation: 0
Open the tube. Copy - Paste, as a new layer. Rezise if needed and place it.
Now add all the elements you want to finish your tag. I've used these elements:
bow 2
cupcake 5
curly ribbon 1
curly ribbon 2
deer
flower 1
holly
penguin 1
santas bag
snowflake charm 9
train cases
tree 5
wreath 1
apply drop shadow:
V: 1 H: 4
O: 50 B: 5
Add your name and copyright. Save as jpg or png.
Snowflake's friend

Supplies Needed:
PSP
Tube of choice. I am using one by Lady Mishka, you can purchase the tube here
Scrap Christmas Delight (PTU) by Bibi. You can buy it here
Eye candy 4000
Muras Meister Copies
Font here
Open a new image 600x600.
Open: Christma Delight (9). Copy - Paste, as a new layer.
Go to: Effects - Plugins - Mura's Meister - Copies:

Open: Christma Delight (32). Copy - Paste, as a new layer. Resize at 65 - Smart Size.
Duplicate and resize at 90 percent. Select the original frame layer and colorize with a color from the tube.
Open: Christma Delight (25). Copy - Paste, as a new layer and resize. Decorate if you want.
Open: Christma Delight (15). Copy - Paste, as a new layer. With the magic wand click inside of the frame.
Selections - Modify - Expand: 5.
Open: Christmas Delight PAPERS (8). Copy - Paste, as a new layer and resize.
Selections - Invert. Edit - Clear. Deselect. Move the layer below the frame.
Finish decorating with elements from the kits. I chose these:
Christma Delight (12)
Christma Delight (2)
Christma Delight (26)
Christma Delight (33)
Christma Delight (41)
Christma Delight (44)
snow
apply drop shadow:
V: -1 H: 2
O: 45 B: 4
Add your name and copyright. If you want a non animate tag, save now as jpg or png.
To animate:
Activate the bottom layer (encircle snowflakes). Effects - Plugins - Eyecandy 4000 - HSB Noise:
Layers - Merge - Merge Visible. (you cand add a white background)
Edit - Copy. Open Animation Shop. Paste as a new animation.
Back to psp.
Edit - Undo.(x2) Apply Hsb noise again and hit the random seed button.
Copy merged and Paste after current frame. Repeat 3 more times.
Until you have 5 frames in Animation Shop. Press: Alt + Enter to change the speed to 17.
If you like it save as gif.
You're done!
Suscribirse a:
Comentarios (Atom)