
Supplies Needed:
PSP
Exclusive Scrap Christmas in the City (FTU) by Nicky.
You need to register at SATC forum to download
Template by Leah from Gimptactic Tuts here
Mask by Vaybs from: Creative Misfits here
Xero Plugin here
Font here
Open the template, Shift + D, close the original.
Delete the layers:
credit
top dots
bottom dots
stars 1
stars 2
lrg star 1
lrg star 2
Image - Resize at 85 - Bicubic.
Select the crop tool and apply with these settings:
width: 595
height: 515
Image - Canvas Size: 650x600
placement: center
Select the background layer and floodfill with white of delete.
Open Paper 9, Copy - Paste, as a new layer.
Layers - Load mask: DBVMisfitmask4 - Merge group.
Activate the layer: square 2. Selections - Select All - Float - Defloat.
Open: Paper 2. copy- paste as a new layer. Resize at 70 - Smart size.
Selections - Invert. Edit - Clear. Deselect and delete the original layer.
Activate the layer: square 1. Selections - Select All - Float - Defloat.
Open: Paper 11. copy- paste as a new layer. Resize at 70 - Smart size.
Selections - Invert. Edit - Clear. Deselect and delete the original layer.
Activate the layer: oval 4. Selections - Select All - Float - Defloat.
Open: Paper 2. copy- paste as a new layer. Resize at 70 - Smart size.
Selections - Invert. Edit - Clear. Deselect and delete the original layer.
Activate the layer: oval 3. Selections - Select All - Float - Defloat.
Open: Paper 12. copy- paste as a new layer. Resize at 70 - Smart size.
Selections - Invert. Edit - Clear. Deselect and delete the original layer.
Activate the layer: oval 1. Selections - Select All - Float - Defloat.
Open: Paper 10. copy- paste as a new layer.
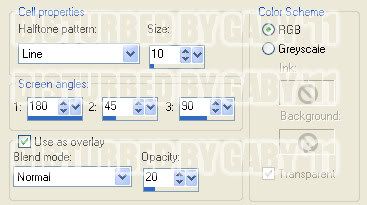
Effects - Artistic Effects - Halftone:
Selections - Invert. Edit - Clear. Deselect and delete the original layer.
Open the closeup of your tube. copy- paste as a new layer. Resize if is needed.
Arrange it in the place of your choice.
Effects - Plugins - Xero - Radiance:
Default settings.
In the layer palette change the blend mode of the layer to: Lighten. Duplicate. Image - Mirror.
Select the oval layer. Selections - Select All - Float - Defloat. Activate the close up layer.
Selections - Invert. Edit - Clear. Selections - Invert. select the duplicate and do the same.
Activate the layer: thin rect 2. Selections - Select All - Float - Defloat.
Open: Paper 11. copy- paste as a new layer. Resize at 70 - Smart size.
Selections - Invert. Edit - Clear.Deselect and delete the original layer.
Activate the layer: words. Adjust - Hue and Saturation - Colorize:
Hue: 0
Saturation: 0
Open the tube. Copy - Paste, as a new layer. Rezise if needed and place it.
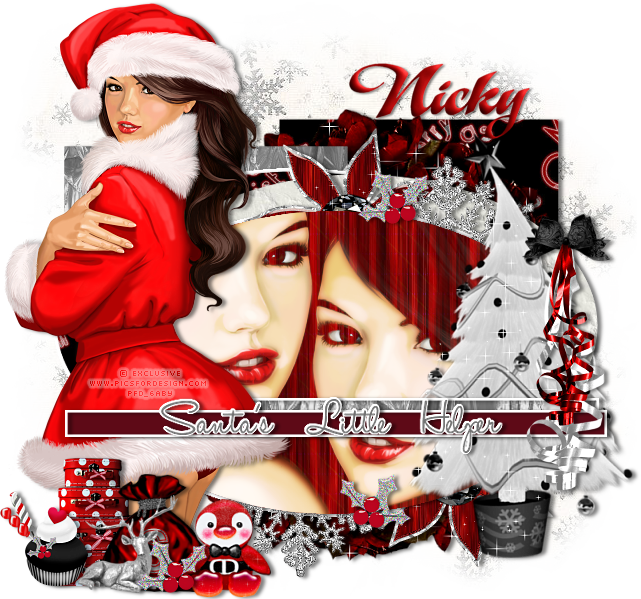
Now add all the elements you want to finish your tag. I've used these elements:
bow 2
cupcake 5
curly ribbon 1
curly ribbon 2
deer
flower 1
holly
penguin 1
santas bag
snowflake charm 9
train cases
tree 5
wreath 1
apply drop shadow:
V: 1 H: 4
O: 50 B: 5
Add your name and copyright. Save as jpg or png.
No hay comentarios:
Publicar un comentario